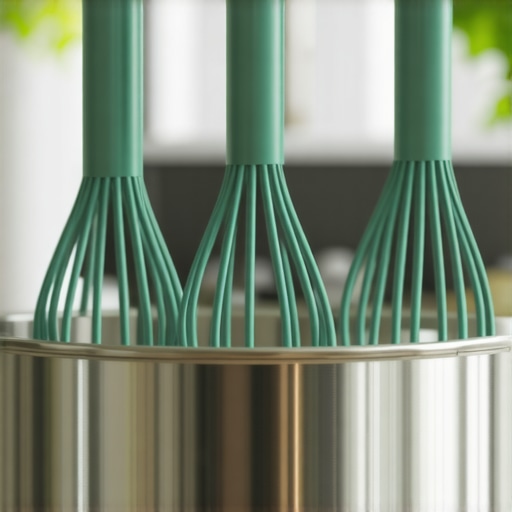
It was a baking session gone wrong—flour everywhere, batter splattered across the counter, and me struggling to keep my mixer steady while desperately trying to scrape down the sides. That frustrating moment hit me hard. I realized that my trusty traditional whisk attachments just weren’t cutting it anymore, especially when dealing with thick, sticky doughs or elaborate meringues. The truth is, I had been settling for mediocre tools, unaware that a game-changing innovation was quietly making waves: silicone-edge whisk attachments designed to scrape the bowl as you mix.
Why I Never Thought a Whisk Could Change the Game in 2026
Honestly, I never imagined that by 2026, a simple attachment could make such a difference. I always thought bowl scraping was a tedious chore I’d have to do manually or settle for uneven mixing. But then I discovered that some modern whisk attachments now come with built-in silicone edges that hug the bowl—ensuring every last bit of batter or dough gets mixed thoroughly. It’s a small innovation, but it saves me so much time and hassle. If you’ve ever wrestled with stubborn ingredients clinging to the sides of your mixing bowl, you’ll understand why this breakthrough matters.
Is a fancy whisk really worth the hype, or just another kitchen fad?
This is the question I grappled with at first. I’m not one to chase every new gadget; I value durability and proven performance. Early on, I made the mistake of buying attachments that looked promising but lacked quality, leading to bent wires or silicone that peeled away. Trust me, I learned my lesson the hard way. That’s why I want to share what I found—and why choosing the right silicon whisk attachment can truly elevate your baking game.
Research shows that efficient mixing tools significantly improve baking results by ensuring even ingredient distribution, which is especially critical for recipes like brioche or sourdough bread. Moving forward, I’ll guide you through how to pick the best bowl-scraping whisk attachments and avoid common pitfalls. Ready to ditch the mess and elevate your baking experience? Let’s dive into the details.
If you’ve faced the struggle of ingredients sticking and struggling to keep up with high-hydration doughs, you’re not alone. Keep reading, and I’ll show you the top features to look for in the best silicon whisk attachments of 2026.
Choose the Right Whisk Attachment
Start by selecting a whisk with a sturdy silicone edge designed for bowl scraping. Look for models that are compatible with your mixer and have flexible silicone that can conform to the bowl’s shape without bending or peeling. I once tried a cheap silicone whisk and ended up with silicone bits in my batter—trust me, investing in quality makes a huge difference. For detailed comparisons, check out the best stand vs. hand mixers guide.
Attach the Whisk Correctly
Ensure the whisk is securely attached to the mixer. For most stand mixers, align the attachment with the socket and turn clockwise until it clicks into place. For hand mixers, insert the whisk’s peg into the socket firmly. Proper attachment prevents wobbling and ensures even pressure distribution, which is crucial when scrapping and mixing simultaneously. I learned this when my whisk kept wobbling, causing uneven mixing and awkward noise. Tightening it solved the issue instantly.
Adjust Speed Settings for Optimal Mixing
Set your mixer to a low to medium speed—starting slow prevents splattering. As ingredients incorporate, increase the speed gradually. For thick doughs, a higher setting could cause motor strain or splatter, especially if your whisk isn’t designed for it. I once tried to mix bread dough on high speed, and my motor smoked—so now, I stick with low for heavy mixes. For more tips, see the preventing motor burnout guide.
Master the Technique for Consistent Results
Begin by inserting the whisk into the bowl, and turn the mixer on low. Slowly tilt the bowl as you mix in a circular motion, allowing the silicone edge to glide along the sides, scraping as it goes. When working with sticky or high-hydration doughs, pause periodically to scrape residual dough from the silicone edge, then resume. During a recent sourdough experiment, I held the bowl at a slight angle, enabling the silicone edge to efficiently scrape and incorporate ingredients evenly—resulting in a smooth, elastic dough without overmixing.
Maintain and Replace Worn Parts Regularly
Inspect the silicone edge frequently for cracks, tears, or peeling. Over time, repeated use and cleaning can diminish effectiveness. I replaced my whisk after noticing silicone starting to peel, which prevented ingredients from scraping properly and affected my baking quality. When replacing, choose attachments crafted from durable silicone with reinforced edges, similar to the high-quality options discussed in the pro-grade whisk guide. Proper maintenance ensures consistent performance and prolongs the lifespan of your tools.
Experiment with Mixing Patterns
Try varying your mixing patterns—sometimes moving the bowl in circular or figure-eight motions helps ingredients blend uniformly, especially when incorporating delicate items like whipped egg whites. During my last cake-baking session, employing a gentle figure-eight motion with my silicone-edged whisk resulted in fluffier meringue, with less deflation and a smoother texture. Practice and observation streamline the process, giving you a more professional finish every time.
Remember, mastering the technique of using silicone-edge whisks for bowl scraping transforms the baking experience, allowing you to focus on flavor and creativity rather than managing mess and uneven mixes.
Even seasoned bakers often fall into the trap of oversimplifying their equipment choices. One common misconception is assuming that all mixers—be they stand or hand models—are interchangeable for every task. In reality, each type has nuances that can dramatically affect your baking outcomes. For instance, many believe that a high-powered stand mixer is always the best for kneading dough, but neglect that certain recipes, like high-hydration sourdough, may require specific attachments or even manual techniques. Relying solely on wattage as a quality indicator can lead you astray; instead, focus on the versatility and compatibility of attachments, especially whisk options. | |
|
A recurring myth is that hand mixers can’t handle thick or heavy doughs. While it’s true that some models struggle with extreme loads, modern high-quality hand mixers often come with robust motors and specialized beaters that can perform impressively. However, many users fail to optimize their technique, for example, by overloading the mixer or choosing inappropriate speeds. Understanding these subtleties is crucial because mismatched expectations often lead to premature motor burnout or poor mixing results.
When considering dough mixing, there’s an often overlooked nuance: the importance of accessory design. Silicone-edged whisk attachments, for example, are frequently dismissed as gimmicks, yet they are proven to improve ingredient incorporation and reduce the need for manual scraping. Not all attachments are created equal, and choosing ones with reinforced silicone edges can prevent common issues like peeling or bending. For advanced bakers, experimenting with different mixing patterns—like gentle figure-eights versus circular motions—can optimize gluten development and avoid overmixing.
A significant mistake many make is neglecting to properly maintain and replace worn parts. Silicone edges deteriorate over time, and using a worn attachment can hinder mixing efficiency, especially for delicate tasks like meringues. Regular inspection and timely replacement, particularly with high-quality parts, help maintain consistent performance. To maximize the lifespan of your equipment, consider the durability of attachments as much as the motor specifications. For comprehensive guidance, check out our ultimate guide to choosing the best mixer.
Have you ever fallen into this trap? Let me know in the comments. Let’s ensure we all master our tools for better baking results!
Prioritize Regular Maintenance for Optimal Performance
To keep your baking tools running smoothly over the years, consistent maintenance is key. I make it a habit to inspect my stand and hand mixers after every few uses, paying close attention to wear on attachments like whisk or paddle heads. Regularly cleaning these parts prevents buildup of flour or batter residue, which can cause deterioration and impact performance. For instance, a simple wipe with a damp cloth and a thorough hand wash of removable parts prolongs their lifespan and maintains the efficiency of your mixer.
Invest in High-Quality Tools and Attachments
While it might seem tempting to save money with cheap accessories, in the long run, high-quality tools offer better durability and performance. I personally prefer silicon-edged whisk attachments with reinforced silicone rims because they resist peeling and bending during heavy mixing tasks. These attachments not only last longer but also provide superior bowl scraping, reducing the need for manual cleaning and ensuring even mixing. When choosing your equipment, refer to comprehensive guides like the ultimate guide to selecting the perfect mixer for your needs.
Use Correct Storage and Handling Techniques
Proper storage and handling can significantly extend the life of your mixers and attachments. I store my accessories in a dedicated drawer with dividers to prevent bending or damage. When assembling or disassembling, I make sure to handle parts gently, avoiding excessive force that could cause cracks or misalignments. This kind of care preserves not only the integrity of your tools but also ensures safety during operation. As a tip, avoid exposing your mixers to extreme temperatures or moisture, which can degrade their internal components over time.
How do I maintain my mixer tools to ensure they last for years?
Perform regular inspections, keep attachments clean and dry, and replace worn parts promptly. For example, silicone whisk edges tend to wear out after extensive use, and replacing them at the right time guarantees you won’t face uneven mixing or broken parts. According to expert advice from industry professionals, such proactive maintenance is essential for maintaining consistent baking performance. Implementing these small habits will protect your investment and keep your baking routine running smoothly.
Another tip is to routinely check for manufacturer recalls or updates on your specific mixer model. Manufacturers like KitchenTechHQ provide detailed articles on common issues and solutions, such as fixing rattling whisk attachments. Staying informed can prevent costly repairs later on. I recommend trying one advanced tip today: regularly inspecting silicone edges for cracks and replacing damaged attachments immediately. This simple step can make a noticeable difference in your baking process and tool longevity.
Scaling Your Equipment for Bigger Bakes
As you become more experienced, scaling your baking ambitions often means upgrading or adding tools. I’ve found that investing in heavy-duty attachments and a robust mixer can handle larger batches without strain. For example, my switch to a professional-grade silicone whisk increased efficiency during large meringues or bread kneading. Always consider your future baking plans when choosing equipment, as the right tools will adapt with your skill level and volume needs. When in doubt, consult detailed comparison guides—like the top mixer comparisons—to make informed decisions.
Through my journey exploring innovative baking tools, I uncovered that the real game-changer isn’t just the mixer itself but the attachments that enhance performance and ease of use. One profound lesson I learned is that selecting high-quality, durable silicone-edge whisk attachments can lead to consistently perfect mixes, even with sticky or high-hydration doughs, saving you time and frustration. Moreover, understanding the subtle nuances of attachment maintenance and the techniques for optimal scraping reveals that mastery over your tools directly translates to better baked goods. Lastly, immersing myself in dedicated resources like the comprehensive comparisons of mixers and the ultimate guide to choosing the ideal mixer expanded my understanding of selecting the perfect tools for my specific needs, leading to more confident baking ventures.
Wow, this post really opened my eyes to how much innovation has been integrated into everyday baking tools. I’ve always struggled with sticky batters clinging to my traditional whisk attachments, especially when trying to incorporate high-hydration doughs. The silicone-edge whisk attachments sound like a game-changer, not just for saving time but also for achieving more consistent mixes. I remember trying to manually scrape batter from the sides of my bowl, which was tedious and often led to uneven results. Since I started using a silicone spatula, my mixing has improved, but I never considered a specialized whisk that does the same job during the process. Has anyone here experienced a noticeable difference when switching from standard to silicon-edged whisks, particularly with delicate recipes like meringues or soufflés? I’m curious about how durable these attachments are over time and if they require special cleaning routines. Overall, I think investing in high-quality attachments is worth it for any serious baker aiming for perfect results without the mess!