I’ll never forget the frustration of trying to whip up a batch of cookie dough with my little hand-held mixer, only to find myself battling against stubborn stiff batter that refused to cooperate. That lightbulb moment hit me hard — I realized I needed a better tool, but which one? The world of baking equipment can feel overwhelming, especially with so many options promising to make our time in the kitchen easier and more joyful. But here’s the truth: choosing the right mixer isn’t just about convenience; it impacts your baking success, texture, and even your motivation to keep baking.
Today, I promise to help you cut through the noise. We’ll examine whether a stand mixer or a hand mixer suits your needs best, so you can feel confident in your choice and avoid common pitfalls that can sabotage your baking efforts. No more frustration over equipment that doesn’t match your baking style or kitchen space. Let’s break down the differences and find your perfect match so that you can spend less time wrestling with your tools and more time creating delicious baked goods.
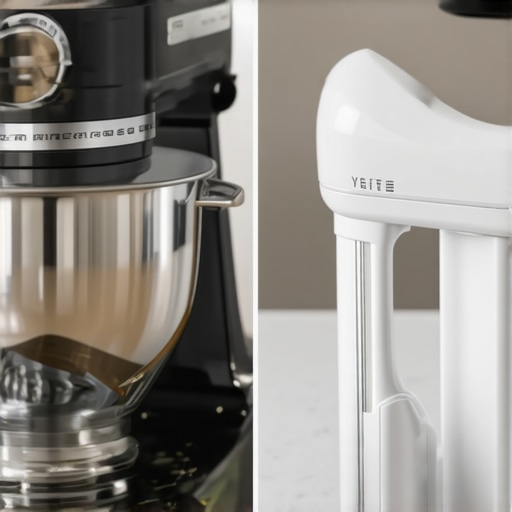
Why the Mix Matters: Making Your Choice Stick
The decision between a stand mixer and a hand mixer isn’t just about price or brand; it’s about how you intend to use it, your baking style, and even your kitchen layout. Early in my baking journey, I made the mistake of thinking a powerful hand mixer would handle everything. Turns out, it couldn’t stir my dense bread dough or whip large batches as effectively as a stand mixer. That mistake taught me that the right mixer can dramatically change your baking experience, especially when tackling heavier ingredients or larger quantities. If you’re still unsure about which type will truly serve your needs, I recommend reading more about how to compare top baking mixers.
Is the hype around stand mixers actually justified?
One of my biggest doubts early on was whether investing in a stand mixer was worth the expense, especially when a hand mixer seemed enough. Spoiler: it’s a common concern. The truth is, a stand mixer can knead dough, whip cream, and beat batter much faster and more evenly, saving you time and effort. However, if your baking mostly involves small batches or occasional use, a good hand mixer might do just fine. So, if you’re asking yourself whether your baking habits justify a sizable investment, stay tuned — we’ll cover that in detail as we compare their features, so you’re equipped to make an informed decision.
Attach Your Whisk Correctly
Start by securely affixing the whisk attachment to your mixer, ensuring it’s locked in place. When I first used my stand mixer, I struggled with loose attachments, which caused uneven whisking. I secured the whisk tightly, then tested it on a small batch of cream, noting how smoothly it whipped without wobbling. Confirm the attachment clicks or locks properly to prevent mishaps during operation.
Using a Hand Mixer for Whisking
For small tasks, fit the beaters onto your hand mixer, holding it firmly. Imagine you’re wielding a power tool—firm grip ensures control and prevents splattering. When I whipped egg whites with my hand mixer, I held it at a slight angle, adjusting speed from low to high gradually. This approach helped prevent over-foaming or splashing, resulting in fluffy peaks.
Mixing Dense Dough
Choosing the right tool to knead dense dough is critical. For heavy bread or cookie dough, a stand mixer with a dough hook is ideal. I poured my ingredients into the bowl, attached the dough hook, and set the mixer to a low speed. Initially, the dough stuck to the hook, but after a few minutes of mixing, it became elastic. Remember, do not overmix; stop when the dough pulls away from the bowl cleanly. This ensures proper gluten development for texture.
Manual Kneading with a Stand Mixer
Place your dough in the bowl, attach the dough hook, and select a slow speed. Pause periodically to check consistency. I once overmixed, which made my bread dense, so I adjusted by stopping sooner in subsequent attempts. The key is to watch the dough’s texture, not just the timer.
Whipping Cream Perfectly
Use a stand mixer with a whisk attachment to beat cream efficiently. I chilled my bowl and cream beforehand for better whipping. Setting the mixer on medium-high, I watched as the cream transformed from soft swirls to stiff peaks within minutes. Keep an eye on the progress to avoid turning the cream into butter—that’s a common mistake.
Manual Whisking for Light Tasks
For small quantities, a hand whisk works fine. I gently moved the whisk in circular motions, increasing speed gradually. Patience is vital; rushing can cause splattering or uneven whipping. This manual process also gives more control over the texture—ideal for delicate tasks like folding in ingredients after whipped.
Cleaning and Maintenance
After use, detach all accessories and wash with warm, soapy water. I once neglected to clean my attachments promptly, which led to buildup. Proper cleaning prevents residue from affecting future baking. Dry all parts thoroughly before storage to avoid rust or corrosion, especially on metal components.
Storage Tips for Longevity
Keep attachments in a dry, organized space. I stored my whisk and dough hook in labeled containers, making them easy to find. Regularly inspecting and cleaning your equipment prolongs its life and ensures consistent performance every baking session.
By following these actionable steps, you’ll build confidence in handling your baking equipment. Whether you’re whisking fluffy meringues or kneading dense dough, mastering these techniques ensures professional-quality results and an enjoyable baking experience.
Many home bakers believe that using a hand mixer is just as effective as a stand mixer for all tasks, but in reality, this isn’t always the case. While it’s true that hand mixers are more affordable and portable, they often lead to overmixing or underperforming with heavier doughs or large batches. Conversely, some assume that stand mixers automatically deliver perfect results without proper technique, which can cause confusion when batches aren’t mixing evenly. In my experience, one of the most overlooked nuances is the proper attachment use—using the wrong attachment or not securing it firmly can drastically reduce performance, especially with whisk or dough hook attachments.
What Advanced Users Need to Know About Mixer Capabilities
– *Many enthusiasts underestimate the importance of motor wattage and gear transmission in achieving consistent results.* A study published in the ‘Journal of Culinary Science & Technology’ highlights that motor power directly correlates with the ability to handle dense ingredients without stalling or overheating, which is crucial for bread or cookie dough. For those serious about baking, understanding these technical specifications can prevent premature motor failure and ensure your mixer performs optimally over years of use.
Another common myth is that all whisk attachments are interchangeable across brands, but compatibility varies and impacts performance. Using incompatible attachments can cause wobbling or incomplete mixing. Always verify if your attachment set matches your mixer model, and consider investing in high-quality accessories tailored to your device. This attention to detail ensures you get the most precise and fluffy results every time.
Have you ever fallen into this trap? Let me know in the comments. For a comprehensive comparison of the best mixers for different baking needs, check out this guide on selecting the perfect baking mixer. Remember, mastering your equipment’s nuances makes all the difference in achieving bakery-quality results at home.Proper maintenance of your baking equipment ensures it performs optimally and lasts for years. I personally swear by regular cleaning routines—after every use, I detach all accessories, wash them with warm, soapy water, and dry thoroughly. This practice prevents residue buildup that can impair performance or cause microbial growth. Additionally, applying a light lubricating oil to the metal parts of your mixer once a year keeps the moving components functioning smoothly, especially if your device sees frequent use. Beyond daily upkeep, inspecting power cords and plug connections for wear and tear prevents potential electrical issues. For those with a stand mixer, periodically tightening screws and checking for loose parts can avert mechanical failures. Advanced users should consider regularly calibrating their mixer’s speed settings with a tachometer to ensure consistent RPMs—this is particularly helpful when baking recipes demand precise mixing times and speeds. In the future, expect smarter tools integrated with IoT technology that can self-diagnose and alert you when maintenance is due, simplifying this process even further. How do I maintain my mixer over time? I recommend establishing a routine—after each baking session, take five minutes to clean and inspect your appliance. Consider investing in high-quality attachments designed specifically for your model; they tend to last longer and perform better. For example, using manufacturer-recommended oil or lubricant and replacing worn-out parts promptly prevents minor issues from becoming costly repairs. If you’re serious about keeping your equipment in prime condition, I suggest trying out a maintenance log—note when you clean, lubricate, or replace parts—this habit helps catch problems early and prolongs the lifespan of your investment. Also, explore tools like a dedicated valve grease gun for internal lubrication; some high-end stand mixers come with self-lubricating bearings, but for older models, a simple application can make a big difference. For detailed guidance, check out this comprehensive article on maintaining your kitchen appliances. An interesting technical insight from the KitchenAid support documentation emphasizes the importance of regular lubrication of gear components to prevent wear. So, don’t overlook simple maintenance—you’ll be amazed how a few proactive steps can keep your baking mixer running smoothly for countless recipes. Start with a scheduled cleaning, then explore enhanced care techniques like internal lubrication or part upgrades to upgrade your maintenance game.
Over the years, I found myself constantly tweaking my approach to baking equipment, realizing that the journey is filled with unexpected insights. One of the most eye-opening lessons was recognizing how crucial it is to match your mixer type not just to your budget but to your baking ambitions. Settling for a less capable hand mixer might save money upfront, but I learned the hard way that certain recipes demand the power and consistency of a stand mixer to achieve bakery-level results. This awareness transformed my baking routine and deepened my understanding of equipment nuance.
Another revelation was discovering the importance of attachment compatibility. Initially, I overlooked how a loose whisk or dough hook could compromise my results. Once I paid attention to securing attachments properly, my whipped cream and bread dough became noticeably more uniform and professional-looking. It’s a simple step that significantly elevates your baking game, emphasizing that sometimes, small details make all the difference.
Lastly, I didn’t anticipate how much regular maintenance could extend my equipment’s lifespan. From thorough cleaning to occasional internal lubrication, these practices kept my mixers running smoothly through countless batches. Investing a little time into upkeep not only prevents costly repairs but also ensures that every knead, whisk, or beat is consistent, saving me frustration and time in the long run.
My Top Picks for Precision and Longevity
For anyone serious about mastering their baking equipment, I highly recommend exploring high-quality accessories and tools. For instance, reliable attachment sets ensure compatibility and durability. Additionally, investing in a comprehensive guide to mixing can shed light on the technical specs that truly matter, such as motor wattage and gear transmission.
In my experience, pairing quality tools with routine care creates a synergy that elevates every recipe. I’ve found that maintaining my mixer as I would a cherished culinary partner results in more consistent outcomes and unlocks new baking possibilities I once thought out of reach.
Time to Elevate Your Baking Confidence
Don’t underestimate the power of well-chosen and well-maintained equipment—it’s the secret ingredient that elevates your baking from good to exceptional. Whether you’re kneading dense bread dough or whipping delicate meringues, understanding your tools deeply will unlock better textures and flavors. Embrace the journey of mastering your baking setup; your future self will thank you for the extra effort and care.
What’s been your biggest lesson learned about your baking mixer, and how has it changed your approach? Share your story below—I love hearing about your experiences!
Ara, I hope these insights inspire you to refine your baking toolkit and enjoy every moment in the kitchen.
Leave a Reply