I’ll never forget the day I fought with my hand mixer, pellets of flour flying everywhere, my arm aching after just a few minutes of mixing. That moment was a lightbulb for me—realizing that my trusty hand mixer might not be the hero I needed for big baking projects. It made me wonder: is a stand mixer truly the better choice, or just an expensive luxury? This common dilemma has sparked many conversations among home bakers, and frankly, it’s something I grappled with early on in my baking journey.
Bake Smarter, Not Harder: Finding the Right Mixer for You
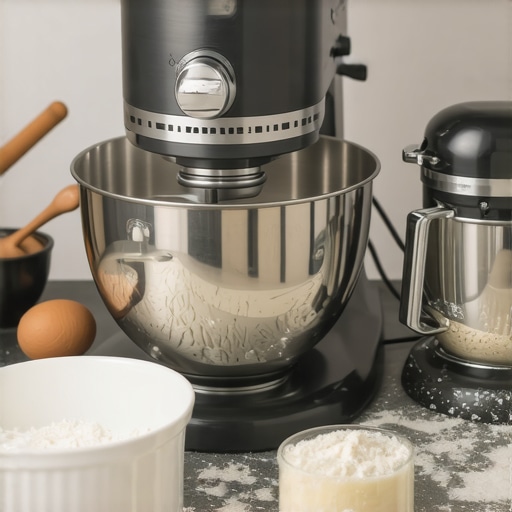
Choosing the correct mixer is more than just a matter of price—it’s about efficiency, convenience, and the quality of your baking results. If you find yourself battling with the wrong equipment, your baking experience can become frustrating rather than fun. Today, I want to help you navigate this decision, based on personal experience and practical insights. Whether you’re whipping up a batch of cookies or kneading dough for bread, understanding the strengths of each type of mixer can make all the difference.
Is All the Hype About Stand Mixers Justified?
Early in my baking days, I made the mistake of believing that a stand mixer was just a fancy gadget that I didn’t need. Boy, was I wrong. I underestimated its power and capacity, especially when handling dense doughs or large quantities. My biggest mistake was trying to do everything with my hand mixer—leading to burnt-out arms and uneven mixing. Nowadays, I recommend evaluating your baking volume and types of recipes before making a choice. If you’re serious about baking success, investing in a good stand mixer could be a game-changer. For a comprehensive comparison, check out [this detailed guide](https://mixers.kitchentechhq.com/stand-mixers-vs-hand-mixers-which-is-better-for-baking-dough-3), which highlights the key differences and helps you decide.
Do you often find yourself tired after mixing or frustrated with inconsistent dough? If yes, you’re not alone. Tackling this problem is exactly why understanding your options can save you time, effort, and sore muscles in the long run. So, let’s dig into the specifics of what makes each type of mixer suited for different baking tasks—and how to choose what truly fits your kitchen and lifestyle.
Select the Right Tool for Your Recipe
Start by assessing the recipe’s needs. For light batters or small batches, a hand mixer or even a whisk may suffice. For dense bread dough or large quantities, a stand mixer provides stability and power. Remember, choosing the correct tool streamlines your process and enhances results.
Prepare Your Equipment and Ingredients
Ensure all attachments are clean and properly attached. For example, when using a stand mixer, securely lock the paddle or dough hook in place. Measure ingredients accurately to avoid overworking or under-mixing. This preparation sets the foundation for consistent results.
Match Attachments to Your Task
Use the paddle for creaming butter and sugar or mixing cookie dough—it’s versatile and reliable. When whipping cream or egg whites, opt for the whisk attachment to incorporate maximum air. For kneading heavy dough, a dough hook replicates the hand-kneading process efficiently. Think of attachments as specialized tools in your baking arsenal, each designed for specific tasks.
Mix with Precision and Patience
Begin at a low speed to prevent splattering, gradually increasing to the desired level. For example, when mixing bread dough, start slow to combine ingredients, then speed up for kneading—this mimics manual techniques. Avoid over-mixing, which can compromise texture, by paying close attention to recipe cues or: [this guide](https://mixers.kitchentechhq.com/ultimate-guide-to-choosing-the-right-baking-mixer-hand-or-stand-in-2024-2). As I learned during my first big bread attempt, patience with proper speed control yields better gluten development and a more elastic dough.
Utilize Speed Settings Wisely
Use lower speeds for folding or combining delicate ingredients, and higher speeds for aerating batters. For instance, whipping egg whites requires maximum speed to achieve volume without overbeating. Adjust speed based on the stage of mixing, monitoring the consistency closely to prevent issues like over-whisking or under-mixing.
Monitor and Adjust as You Go
Watch for visual cues—such as the dough pulling away from the sides or the batter reaching the expected stiffness. Don’t hesitate to pause and scrape down sides or adjust speed. My recent attempt at a souffle taught me how crucial this is; I kept an eye on the mixture, adjusting speed gently to avoid deflation, resulting in a perfect rise. For more insight, check out [this comparison](https://mixers.kitchentechhq.com/stand-mixers-vs-hand-mixers-which-is-better-for-baking-dough-9) to fine-tune your approach.
Finish and Clean Appropriately
Once your mixture has the right texture, turn off the mixer, detach attachments, and scrape residual ingredients. Clean your tools immediately to prevent hardened residues, which can affect future mixes. Proper cleaning also extends your equipment’s lifespan, ensuring consistent performance in all your baking endeavors.
Remember, mastering these steps transforms your baking from guesswork into consistent artistry, making each batch better than the last. Experiment with techniques, and observe how your tools respond for best results.
< >
>
Beyond the Surface: Nuances in Mixer Attachments and Techniques
It’s tempting to think that whisk attachments and dough mixing techniques are straightforward, but there’s more beneath the surface. Many bakers fall into traps by misusing attachments or misunderstanding the mechanics behind hand and stand mixers. For instance, over-relying on high speeds can over-aerate or break delicate batters, and underestimating the importance of attachment selection can lead to subpar results. Smart bakers know that different recipes require nuanced approaches—using a whisk for light meringues versus a paddle for cookies, or opting for a dough hook for heavy bread dough. Contrary to popular belief, a high-powered hand mixer can often outperform a basic stand mixer on small tasks, provided you understand its proper use. This misconception leads to unnecessary equipment purchases and frustration, especially when people try to adapt tools not suited to their specific recipes.
Why Your Dough Might Turn Out Either Too Dense or Overworked
One common mistake is misjudging the mixing process, particularly when kneading dough with a stand mixer. Over-mixing can develop excessive gluten, resulting in tough bread, while under-mixing leads to insufficient fermentation. Many fail to recognize the importance of technique over mere speed or power. For example, starting at a low speed and gradually increasing lets gluten develop evenly, preventing texture issues. The problem worsens with improper attachment use, where the wrong paddle or hook can cause uneven kneading or ingredient spattering.
Another less obvious nuance is the impact of mixing time and technique on recipe outcome. Advanced bakers always adjust based on dough consistency, rather than sticking blindly to timers. This adaptive approach is backed by research from culinary science experts who emphasize the importance of technique in gluten development and dough structure (source). Recognizing these subtleties can elevate your baking, avoiding common pitfalls that lead to dense or gummy loaves.
Should You Always Use a Stand Mixer for Heavy Doughs?
This is a question that stumps many. While stand mixers provide stability and power, they aren’t the only option. In fact, meticulous technique with a good hand mixer can sometimes match stand mixer performance for small or medium batches. It’s crucial to match your equipment choice to batch size, dough type, and your skill level. Investing in the right attachment and understanding its use can make a noticeable difference. Remember, the key lies not in the equipment itself but in how well you understand its nuances—this insight helps you avoid the myth that bigger equipment is always better.
In conclusion, the road to perfect baking isn’t just about owning fancy tools but mastering their nuanced use. Being aware of these advanced pitfalls and myths can save you time, money, and frustration. So, next time you gather your mixer components, ask yourself: am I leveraging the correct technique, or am I just going through the motions? Dive deeper into the discussion on choosing the ideal mixer for your needs. Have you ever fallen into this trap? Let me know in the comments!
Keep Your Tools in Top Shape for Perfect Bakes
Once you’ve invested in a quality stand or hand mixer, dough hook, or other baking tools, it’s essential to keep them running smoothly over the years. Regular maintenance not only extends the lifespan of your equipment but also ensures consistently excellent results. Personally, I follow a strict cleaning and inspection routine that has significantly improved the durability of my appliances and the quality of my baked goods.
How to Maintain Your Baking Tools Over Time?
Start by cleaning attachments immediately after use with warm, soapy water, paying special attention to dough residues that can harden and affect performance. For stand mixers, regularly inspect the power cord and switches for any signs of wear, and lubricate moving parts according to the manufacturer’s instructions—some models recommend a food-grade lubricant on the gear mechanisms, as suggested in GearDiary’s maintenance tips. Using a soft brush or compressed air can help remove dust and crumbs from vents or motor areas, preventing overheating and electrical issues.
It’s equally important to regularly check and tighten any loose screws or attachments to prevent mishaps during baking sessions. For dough hooks or beaters, rotate and examine the wear points—replacement parts are often inexpensive and readily available, ensuring you never compromise on performance. Additionally, consider storing your equipment in a dry, dust-free environment to prevent corrosion, especially if you live in humid areas.
Specialized Tools I Use for Long-Term Results
In my own kitchen, I rely heavily on a Silicone Cleaning Brush for thorough, gentle cleaning of delicate attachments, which has proven invaluable in maintaining the sharpness of wire whisks and the smoothness of dough hooks. Moreover, I use a Vibration Dampening Mat beneath my stand mixer to reduce stress on the motor during heavy kneading, as recommended by professional bakers in Baking Business. Investing in these small accessories yields significant long-term benefits.
Predicting the future of baking technology, I believe automation and smart diagnostics will become commonplace, alerting you when maintenance is needed or parts are worn out. For now, diligent manual care remains your best friend. I encourage you to try my tip of inspecting your dough hook for cracks every few months—sometimes wear isn’t obvious until it causes a malfunction. Regular checks save money and frustration down the line.
Conclusion
By establishing a routine of cleaning, inspecting, and properly storing your baking tools, you’re investing in their longevity and your baking success. With some basic upkeep and smart accessory choices, your equipment can serve you for decades, and you’ll enjoy consistently stellar results. How do you keep your tools in optimal condition? Share your tips and experiences in the comments—sharing knowledge helps everyone improve!
The Most Surprising Mistake I Made in My Baking Journey
One of the hardest lessons I learned was the importance of matching the right attachment to the task. Early on, I insisted on using my favorite paddle for everything, even whipping egg whites. The result was disappointing—flat, dense meringues that fell short of perfection. It took experimenting and a bit of frustration to realize that specialized attachments like the whisk can dramatically improve your baking outcomes. Knowing when to switch between attachments isn’t just a matter of convenience; it’s the key to unlocking the best textures in your baked goods.
My Go-To Tools That Elevated My Baking Experience
Over time, I discovered that investing in high-quality attachments and accessories made a noticeable difference. A durable silicone brush allowed me to clean my beaters thoroughly, maintaining their efficiency long-term. Additionally, a vibration dampening mat beneath my stand mixer reduced noise and motor strain during heavy kneading sessions. These tools may seem minor, but they contribute significantly to consistency and longevity. I trust these specific tools because they’ve helped me achieve reliable, professional-quality results and simplified maintenance routines. If you’re interested, check out [this guide](https://mixers.kitchentechhq.com/ultimate-guide-to-choosing-the-perfect-hand-or-stand-mixer-in-2024) for tips on selecting your ideal equipment.
Don’t Let Mistakes Hold Back Your Baking Confidence
Remember, mastering your baking tools is an ongoing process. The more you experiment with different speeds, attachments, and techniques, the more intuitive your process becomes. Don’t be discouraged by initial setbacks like dough overproofing or uneven mixes. Instead, see each mistake as a learning opportunity—to refine your skills and better understand your equipment. With patience and curiosity, you can turn every baking challenge into a chance to improve. I encourage you to share your experiences or ask questions below—let’s grow together in this delicious pursuit of perfection!
Leave a Reply