Ever spent ages mixing a sticky dough or whipping cream by hand, only to realize your arm’s about to fall off? I had that lightbulb moment early in my baking journey when I tried to save a few bucks buying a cheap mixer, only to spend double the time battling ingredients and getting frustrating results. That experience taught me a hard lesson: selecting the right mixer isn’t just about convenience; it can make or break your baked goods.
Why Your Mixer Choice Could Be Sabotaging Your Baking Success
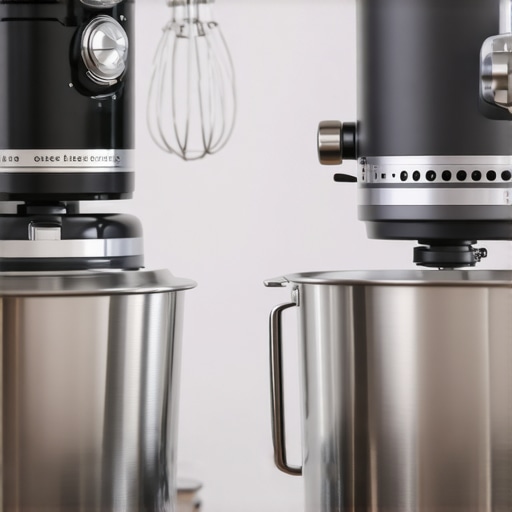
Choosing between a hand mixer and a stand mixer isn’t as simple as it sounds. It’s a decision that can impact everything from the texture of your dough to the time it takes to get your batter ready. As I delved deeper into baking, I learned that each type of mixer has its unique strengths, especially when it comes to whisk attachments and handling dense doughs. Making the right choice ensures you spend less time struggling and more time enjoying the baking process.
Did you know that according to a study by the American Baking Association, the right mixer can reduce preparation time by up to 50%? That’s a huge difference, especially when you’re juggling other kitchen tasks or trying to impress guests. To help you navigate this important decision, I’ll share personal insights and the key factors to consider.
Are you tired of inconsistent results or tired arms from manual mixing? Or perhaps you worry about investing in a machine that won’t handle your favorite recipes? You’re not alone. Many bakers face this dilemma, often making early mistakes like choosing a too-small capacity or ignoring your specific baking needs. Trust me, I’ve been there, and selecting the right mixer is worth every ounce of effort.
Now, let’s explore how to make an informed choice that will elevate your baking game, with practical tips and considerations you won’t regret.
Choosing the Right Mixer for Your Baking Needs
Start by assessing the types of recipes you’ll frequently make. For dense bread doughs, a stand mixer with a powerful motor and dough hook is ideal. If you often whip cream or beat eggs, a hand mixer with versatile whisks will suffice. I once tried to knead whole wheat dough with a lightweight hand mixer, which was a mistake—it struggled and overheated. Opt for a mixer that matches your typical baking tasks, ensuring it can handle the load without strain. For detailed comparisons, check out this guide on choosing between stand and hand mixers.
Preparing Ingredients for Effective Mixing
Before mixing, ensure ingredients are at room temperature unless specified otherwise. Cold butter or eggs can affect aeration and texture. For example, during a recent cake baking session, I softened my butter to achieve a smoother batter—speeding up mixing time and resulting in a lighter crumb. Always measure ingredients precisely; too much flour can make dough stiff, while too much liquid can make batter runny. Proper preparation sets the foundation for consistent results.
Optimizing Mixer Attachments for Best Results
Choosing the right attachment is crucial. Use the paddle for creaming butter and sugar, the whisk for aerating eggs and whipping cream, and the dough hook for kneading bread. Don’t skimp on quality—heck, I learned this the hard way when my cheap whisk attachment snapped during a meringue. For expert advice on attachment selection, see this buying guide. Always start mixing at a low speed to prevent splattering, then gradually increase as ingredients combine smoothly.
Mastering Mixing Techniques for Different Recipes
For airy cakes, beat ingredients just enough to incorporate air, avoiding overmixing that can deflate batter. When working with bread dough, knead until gluten develops—test by stretching a small piece; if it’s elastic and thin, it’s ready. I once overmixed my batter, resulting in a dense texture; now I pay close attention to mixing times, often setting a timer for consistency. Adjust your speed and duration based on the recipe, and always scrape sides of the bowl to ensure even mixing.
Mastering Your Equipment for Consistent Results
Learn how your mixer handles different loads—don’t overload it, especially with heavy doughs. Use the proper speed settings—low for initial mixing, high for whipping. Regularly check and clean attachments to prevent buildup that hampers performance. Remember, patience is key: rushing can lead to uneven textures or damaged equipment. With practice, you’ll develop an intuitive understanding of your mixer’s capabilities, leading to reliably perfect baked goods every time.
Many bakers assume that all mixers serve the same purpose, but in reality, misunderstandings about their capabilities often lead to subpar results. For example, a common myth is that a powerful motor alone guarantees perfect dough, but in practice, the quality of attachments and mixing technique are equally critical. Relying solely on wattage can be misleading; a high-wattage stand mixer with cheap accessories might struggle with dense recipes, whereas a lower-wattage model with premium attachments can excel. This misconception can cause you to overspend on unnecessary power, neglecting the importance of a sturdy build and compatible tools. Moreover, many believe that a hand mixer cannot handle heavy doughs, but with the right beaters and technique, it can be surprisingly effective for smaller batches. The key is understanding the nuances of different attachments—whisk, paddle, and dough hook—and knowing which to use for specific tasks. Sometimes, bakers make the mistake of overmixing, especially in cake batter, which destroys the delicate aeration needed for a light crumb. Advanced bakers avoid this by adopting techniques like mixing at low speed initially and gradually increasing, or by scraping the bowl frequently. Additionally, a less obvious but critical point is the quality of your ingredients; even the best mixer can’t compensate for poorly measured or cold ingredients that affect gluten development or aeration. To truly master your equipment, it’s essential to recognize these subtleties and adapt your approach accordingly. Scientific studies, such as one published in the Journal of Food Science, reveal that improper mixing speeds and durations significantly impact final product texture and volume. Therefore, investing time in learning the detailed functioning of your mixer and attachments pays off in consistent, professional-quality baked goods. Are you still falling prey to any of these misconceptions? Let me know in the comments! To avoid common pitfalls, consider exploring comprehensive guides that compare different models and their optimal uses, such as this [buying guide on choosing between stand and hand mixers](https://mixers.kitchentechhq.com/stand-mixers-vs-hand-mixers-which-is-better-for-dough-baking-tasks). Mastery over your tools not only improves results but also boosts your confidence in tackling complex recipes and baking challenges.Regular maintenance is key to keeping your stand or hand mixer performing at its best over the years. I personally swear by maintaining a routine that includes inspecting attachments for wear, cleaning components thoroughly after each use, and lubricating the hinge points of your stand mixer with a small amount of food-safe lubricant. This simple habit prevents buildup and ensures smooth operation, reducing the risk of breakdowns. For example, I once neglected my dough hook, which led to difficulty in kneading and eventual motor strain. After cleaning and lubricating, it ran like new. When it comes to tools, investing in quality accessories is non-negotiable. I prefer silicon-coated whisks and durable dough hooks from reputable brands because they resist corrosion and maintain their shape even after heavy use. For whisk attachments, I recommend choosing sets that include different wire configurations—balloon, flat, and French whisk—to handle a variety of recipes efficiently. These tools not only last longer but also improve your results by ensuring consistent mixing action.
Looking ahead, I predict that smart, app-connected kitchen tools will become increasingly prevalent, offering real-time diagnostics and maintenance alerts to prevent surprises. This integration of technology will make it even easier to care for your equipment and achieve flawless bakes.
How do I maintain my mixer over time?
Regularly inspect your attachments for signs of wear or damage, clean all components thoroughly after each use with mild soap and warm water, and lubricate hinge points or motors if recommended by the manufacturer. Avoid overloading your mixer with dense doughs beyond its capacity, which can cause strain and reduce lifespan. For detailed guidance, check out this comprehensive buying guide on maintaining your baking tools. Trust me, a little preventive care goes a long way—try incorporating a weekly cleaning schedule and see how much longer your mixer stays in top shape. Mastering maintenance not only prolongs your equipment’s life but also ensures every baking session is smooth and successful.
Over time, I learned that truly mastering your baking mixer goes beyond just choosing the right model. One profound lesson was realizing that technique and maintenance are just as critical as the equipment itself. Regularly cleaning your attachments, understanding the nuances of speed settings, and knowing when to switch tools can elevate your baking from ordinary to professional-quality. For example, I found that lightly warming my ingredients and properly securing attachments resulted in more consistent results. This attention to detail transformed my approach, turning what once felt like trial-and-error into a confident, finesse-filled process.
The Wisdom Hidden in My Baking Journey
- Patience beats power: A high-wattage mixer is tempting, but knowing how to control your speed and times is what truly makes a difference, especially with delicate meringues or intricate doughs.
- Small adjustments matter: Tweaking how long you blend or switch attachments during a recipe can dramatically affect texture—it’s often the subtle changes that lead to perfection.
- Learning from setbacks: Overworking dough or over-whisking can deflate your masterpiece. Recognizing these moments taught me to trust my instincts and observe the behavior of ingredients more closely.
Tools That Changed My Baking Perspective
- This comprehensive guide helped me understand what specs truly matter, proving that quality tools with suitable attachments outperform more expensive but mismatched options.
- Specialized attachments like durable dough hooks and balloon whisks became game-changers, making tasks easier and results more reliable.
- This expert buying guide opened my eyes to the importance of balance between power, size, and versatility—saving me from impulsive purchases and helping me build a tailored set of tools.
Your Next Step in Baking Excellence
Remember, the journey to baking mastery is ongoing. The more you learn about your mixer’s capabilities and limitations, the more confidence you’ll gain in your recipes. Embrace the small tweaks, maintain your equipment diligently, and explore new attachments—each step brings you closer to consistently perfect results. Want to elevate your baking game further? Check out this ultimate guide to making informed choices about your equipment, and don’t hesitate to experiment with techniques that suit your style. After all, your perfect bake is just a few careful adjustments away.
I completely agree with the importance of selecting the right mixer for different baking tasks. I used to struggle with dense bread doughs until I invested in a sturdy stand mixer with a good dough hook. It made such a difference, not just in ease but also in the texture of my bread. I’ve found that understanding the specific attachments and their proper use is key—like how a paddle is perfect for creaming but not for kneading. Also, regular cleaning and maintenance have kept my equipment running smoothly. One thing I’d love to hear from others is how they balance the need for a powerful motor versus the importance of quality attachments. Do you think investing in high-quality accessories can sometimes compensate for a less powerful motor? Would love to hear your experiences and tips on choosing equipment that actually lasts and performs well over time.