Ever had that frustrating moment in your kitchen where your mixer just doesn’t quite do what you need it to? Maybe you’ve struggled with inconsistent dough, or your whisk attachments seem like more trouble than they’re worth. I’ve been there, burning time and energy trying to get perfect results, only to realize I was using the wrong tools or attachments for the job. That lightbulb moment changed everything for me, and I want to help you avoid the same pitfalls.
Why Picking the Right Mixer Can Transform Your Baking Experience
Choosing the ideal mixer isn’t just about fancy features or brand names. It’s about understanding what tasks you’ll be doing most often and selecting equipment that makes your life easier. For example, I used to think a powerful stand mixer was all I needed until I realized I was missing out on the versatility of the right attachments, especially for whisking and dough-making. The right setup can save you hours and ensure consistent, bakery-quality results right at home.
Today, I’ll walk you through the essential considerations—like choosing between stand and hand mixers, understanding different whisk and dough attachments, and how to match your tools with your baking goals. I’ll also share some common mistakes I made early on, so you can skip the frustrations and get straight to baking delicious bread and desserts. If you’ve ever felt overwhelmed by the options or unsure whether a stand mixer is worth it, stick around. We’ll clear up those doubts and get you confidently equipped for your next baking adventure.
Have you faced the challenge of selecting the right mixer or attachments for your baking projects? Let’s solve that today!
In my early days, I made the mistake of buying a mixer with too many bells and whistles, only to realize I rarely used half of them. A more focused approach—like understanding the differences between stand and hand mixers and their respective strengths—would have saved me money and frustration. For a detailed comparison, check out this guide on stand vs. hand mixers.
Now, with a clearer understanding, I can confidently choose the right tools for each task, whether it’s whipping egg whites or kneading heavy bread dough. This knowledge isn’t just useful—it’s essential for consistent baking success. Ready to discover how to pick the perfect mixer and attachments? Let’s dive into the details that will make your kitchen your personal bakery.
Assess Your Baking Needs
Start by listing the most common tasks you perform in your kitchen—whisking eggs, whipping cream, kneading bread dough, or mixing cookie batter. This step helps you identify which attachments and mixer types will serve your goals best. I once thought I needed a high-powered stand mixer for everything, but after evaluating my actual needs, I realized a versatile hand mixer with specific attachments was more practical and affordable. This approach saves money and ensures you’re equipped for your frequent tasks.
Choose Between Stand and Hand Mixers
Decide whether a stand mixer or hand mixer suits your style. If you bake large batches regularly or need hands-free operation, a stand mixer offers stability and power. For smaller tasks or limited space, a hand mixer provides flexibility. For example, I used to struggle with holding a handheld mixer for long periods, but switching to a stand mixer allowed me to focus on the mixing without fatigue. Check out this guide on choosing the right mixer for more insights.
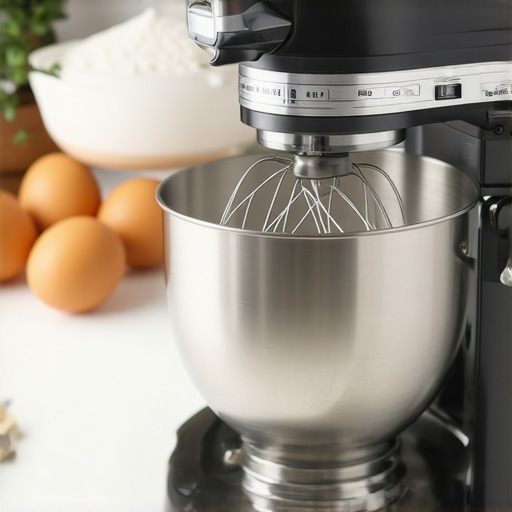
Understand Whisk Attachments and Their Uses
Whisk attachments are essential for incorporating air into your recipes. Balloon whisks are perfect for whipping egg whites or cream, while wire whisks excel at beating light batters. When I prepared my first meringue, I used a balloon whisk attached to my stand mixer, which made the process quick and effortless. Remember to match the whisk type to your task—using a top whisk attachments guide to select the best tool.
Match Dough Attachments to Your Baking Goals
Dough hooks are designed for kneading bread or pizza dough. They mimic hand-kneading by developing gluten structure without much effort. I learned this when I tried mixing heavy whole wheat dough with a standard beater—results were poor and inconsistent. Swapping to a dough hook transformed my baking, giving me bread with a perfect crumb. For best results, check this dough attachment guide to see which is right for your recipes.
Optimize Attachment Usage for Consistency
Use the appropriate speed settings—lower speeds for gentle mixing, high speeds for aeration. When I whipped cream, I started at a low speed to prevent splattering, then increased as the mixture thickened. Also, ensure your attachments are securely fitted to avoid wobbling or uneven mixing. After a few trials, I found that pre-measuring ingredients and adding them gradually helped achieve uniform results. This technique is especially useful for delicate tasks like folding in whipped egg whites or incorporating flour into batter.
Keep Attachments Clean and Well-Maintained
Clean your attachments immediately after use to prevent buildup. I once neglected this step, which caused my whisk to become sticky and less effective. Regularly inspect for wear or damage—replacing worn attachments ensures optimal performance and extends your mixer’s lifespan. Proper maintenance saves you from unexpected breakdowns and keeps your baking consistent.
By following these concrete steps—assessing your needs, choosing the right equipment, matching attachments, optimizing usage, and maintaining your tools—you’ll elevate your baking game. The right combination of mixer and attachments turns complex recipes into straightforward, enjoyable tasks, giving you bakery-quality results every time.
Many home bakers fall into the trap of believing that more features on a mixer automatically mean better performance. This is a misconception I’ve encountered repeatedly. In reality, focusing on the specific needs of your baking repertoire is far more critical than chasing after every new gadget or attachment. For example, some think that a powerful motor is the only thing that matters, but without the right attachments or proper usage, even the most robust machine can underperform. Make sure you understand the nuances before making that investment.
Myth One: Bigger is Always Better
It’s tempting to assume that a larger, more powerful stand mixer will handle all tasks effortlessly. However, this isn’t necessarily true. Oversized machines can be cumbersome and less suitable for small batches. Moreover, they often come with a higher price tag without providing proportional benefits for your typical baking projects. In some cases, a well-chosen hand mixer or a compact stand mixer can be more practical and cost-effective, especially if your baking needs are modest.
Myth Two: Attachments Don’t Make a Difference
Some believe that attachments are just optional add-ons. In fact, the right attachments can significantly improve your results and efficiency. For instance, using a dough hook instead of a regular beater for heavy bread dough ensures better gluten development and a more uniform crumb. Similarly, a balloon whisk can make whipped cream or meringues fluffier and faster. Understanding which attachments to prioritize can elevate your baking to professional levels.
What about the advanced question of mixer motor power and attachment compatibility?
Many advanced bakers are concerned with motor wattage, believing that higher wattage always translates to better performance. While a more powerful motor can handle dense doughs more efficiently, it’s not the sole factor. Attachment compatibility and design matter just as much. Some mixers with lower wattage but optimized gear systems and quality attachments outperform higher-wattage models. For example, a dough hook designed for specific mixer models ensures better gluten development and durability. Always check compatibility and user reviews before choosing your equipment.
Recognizing these nuances helps you avoid common pitfalls and ensures you select a mixer that genuinely fits your baking style. Remember, the goal is to match your tools with your specific tasks, not just chase after the most powerful machine. Have you ever fallen into this trap? Let me know in the comments!
Keeping your mixers and attachments in top shape is essential for consistent baking results and extending the lifespan of your tools. Over time, even high-quality equipment can encounter issues like wear, buildup, or mechanical faults. I’ve found that a regular maintenance routine, combined with the right tools and knowledge, makes all the difference in ensuring your baking gear remains reliable and efficient.
How do I maintain my mixer and attachments over time?
First, always clean your attachments immediately after use. For example, I rinse my whisk and dough hooks under warm water and use a mild dish soap to remove any residual batter or flour. Avoid using abrasive scrubbers that could damage the surface. Once cleaned, dry them thoroughly to prevent rust, especially on metal parts. For stand mixers, periodically check the power cord and plug for any damage, and ensure the speed controls operate smoothly. If you notice any wobbling or unusual noises, consult the manufacturer’s maintenance guide or contact a professional for repairs.
Lubricating moving parts can prevent squeaks and ensure smooth operation. Some models allow for the application of food-grade silicone lubricant on the gear mechanisms—be sure to follow the manufacturer’s instructions. Additionally, inspecting the drive belt (if applicable) and replacing it when frayed or loose helps prevent breakdowns. For more detailed advice, check out this guide on maintenance tips.
Invest in quality tools for longevity
Using high-quality attachments made from durable materials, such as stainless steel, can significantly extend their lifespan. I personally prefer stainless steel whisks and dough hooks because they resist corrosion and maintain their shape over years of heavy use. For instance, my favorite set of stainless steel beaters has lasted over five years without any signs of wear, proving that investing in quality pays off in the long run.
Furthermore, storing your equipment properly prevents unnecessary damage. Keep attachments in a dedicated drawer or container to avoid bending or scratching. Regularly inspect your tools for signs of fatigue or damage, and replace worn parts promptly. This proactive approach ensures your mixer remains dependable and ready for your next baking project.
Looking ahead: The future of baking equipment maintenance
As technology advances, expect more smart features integrated into mixers—such as self-diagnosing systems or automatic cleaning modes—making maintenance even easier. For now, adopting a routine of regular cleaning, inspection, and gentle lubrication is your best bet for long-term performance. I recommend trying out a dedicated food-grade silicone lubricant on your gear mechanisms; it’s a simple step that can make a big difference.
Remember, your tools are an investment. Taking the time to maintain them properly ensures they serve you well for years to come. Don’t neglect this crucial step—it’s the secret to consistently excellent baking results and a more enjoyable kitchen experience.
The Hardest Lesson I Learned About Picking Kitchen Mixers
One of my biggest surprises was realizing that bigger isn’t always better. I once invested in a massive stand mixer, thinking it would handle everything effortlessly, but it turned out to be cumbersome for smaller projects. The lesson? Know your typical baking load before choosing your equipment. This insight saved me money and space, and it can do the same for you.
What I Wish Someone Told Me About Attachments
Initially, I thought attachments were just optional extras. I was wrong. The right attachments—like a specialized dough hook or a balloon whisk—can transform your baking results. For example, switching to a dough hook for bread dough made my loaves rise perfectly, with a better crumb structure. Don’t overlook these tools; they’re game-changers.
The Power of Proper Maintenance
I learned the hard way that neglecting to clean and inspect my mixer and attachments leads to uneven mixing and shortened lifespan. Regularly cleaning, checking for wear, and lubricating moving parts keeps your mixer running smoothly and extends its life. A little maintenance goes a long way in ensuring consistent baking success.
Curated Tools That Make a Difference
My essential toolkit includes a high-quality stainless steel whisk, a durable dough hook, and a versatile hand mixer. These tools have proven reliable over years of baking and are worth the investment. For detailed comparisons and best picks, check out the stand vs. hand mixer guide and related resources.
Your Next Step in Baking Confidence
Choosing the right mixer and attachments isn’t just about equipment; it’s about empowering your baking journey. When you match your tools to your needs, every recipe becomes more satisfying and consistent. Ready to upgrade your kitchen setup and elevate your baking game? Remember, the right tools turn good baking into great baking.
What’s the biggest challenge you’ve faced when selecting a mixer or attachments? Share your story below—I’d love to hear your experience!
,
Leave a Reply