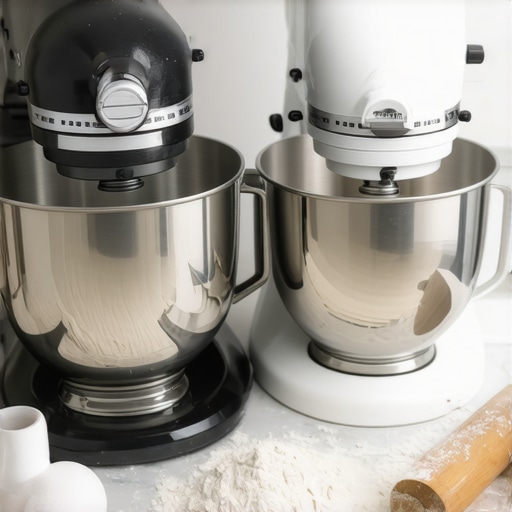
I vividly remember my first attempt at making bread from scratch. The recipe was straightforward, but my mixture turned into a stubborn, lumpy mess. I kept thinking, “Is this really the right mixer for dough tasks?” The missing piece was understanding the difference between a hand mixer and a stand mixer—and knowing which one truly fits my baking needs. That lightbulb moment changed everything.
Why Picking the Right Mixer Changes Your Baking Game
If you’ve ever faced the frustration of dough sticking to your hands or your batter splattering everywhere, you’re not alone. Choosing the proper mixer isn’t just about convenience; it’s about achieving consistent results and saving time. An underpowered tool can make bread kneading a nightmare, while the wrong attachment can lead to uneven mixing and disappointing textures. With so many options out there, it’s easy to feel overwhelmed. That’s where understanding your specific baking goals becomes essential. Whether you’re aiming to knead dense whole grain bread or whip fluffy meringues, the right equipment makes all the difference.
Is Popularity a Reliable Indicator of Quality? Find Out!
Many novice bakers fall into the trap of buying the most hyped machine without considering their actual needs. I once purchased a shiny, high-end stand mixer because everyone else was raving about it—only to find it was too bulky for my small kitchen and overkill for simple cookie dough. Early mistakes like that happen to the best of us. Remember, matching your mixer to your baking style ensures better results and happier baking sessions. Want to get this right from the start? I’ve linked a comprehensive guide on choosing between dough and hand mixers that can help clear up the confusion.
Now that we’ve identified why your choice matters, let’s dive into how to make an informed decision that elevates your baking without breaking the bank. Ready to discover the secrets to selecting the perfect mixer? Let’s go!
,
Selecting the Perfect Mixer for Your Baking Journey
Start by analyzing the types of recipes you frequently make. For dense bread dough, a sturdy stand mixer with powerful motor and dough hook is ideal. In contrast, if your baking mainly involves whipping egg whites or cream, a hand mixer with various attachments suffices. Consider the size of your kitchen and storage space—compact apartments might favor a lightweight hand mixer, while a dedicated baking station can accommodate a larger stand mixer.
Matching Attachments to Tasks
Attachments are the key to versatility. Whisk attachments are excellent for aerating batters or whipping toppings—think of them as the turbo boost for your mixture. Dough hooks, however, mimic hand-kneading but with greater efficiency, perfect for bread and pizza doughs. Be cautious with the attachment selection; using a dough hook for delicate batters can overwork your mixture, leading to undesirable textures. Remember, each attachment serves a specific purpose and using them appropriately ensures optimal results. For detailed insights on attachments, check this comparison of stand vs. hand mixer attachments.
Fine-Tuning Your Mixer Technique
Once you have your equipment selected, the next step is mastering the technique. For stand mixers, starting at a low speed prevents ingredients from splattering and provides better control. Gradually increase speed as the mixture thickens—think of this as turning up the volume slowly. When kneading dough, let the mixer do the heavy lifting—overworking on high speeds can develop gluten bonds excessively, making your bread tough. With hand mixers, use steady, consistent strokes and move around the bowl to ensure even mixing. Practicing proper technique bridges the gap between equipment and exceptional baking. For a comprehensive guide on this, see our expert tips on using different mixers effectively.
Preventing Common Pitfalls
One typical mistake is overloading your mixer beyond its capacity, which strains the motor and causes uneven mixing. Always adhere to the manufacturer’s maximum capacity for ingredients. Additionally, not securing the bowl and attachments tightly can lead to wobbling or detachment mid-operation—imagine your mixer as a dance partner; firm grip ensures a smooth performance. When switching between tasks, wash and dry attachments properly to prevent residue buildup that can affect performance. Learning these small but crucial steps helps maintain your equipment’s longevity and your baking quality. For more on avoiding such mistakes, consult this guide on selecting and maintaining your mixer.
Maximizing Your Equipment’s Potential
Optimize your baking results by pre-measuring ingredients to minimize processing time and avoid overmixing. Use the appropriate speed for each phase—low for incorporating ingredients, high for aeration or whipping. Recognize when your mixer struggles; this is often a sign to switch to a more suitable attachment or upgrade your equipment—think of it as upgrading from bicycle to motorcycle for heavier loads. Experimenting within these parameters helps you understand your tools’ limits and capabilities, leading to better baked goods every time. For advanced tips, explore this comprehensive guide to getting the most out of your mixer.
 Many bakers fall into misconceptions about the proper use of whisk attachments and dough mixing techniques, often leading to subpar results. Contrary to popular belief, not all whisk attachments are created equal; some are designed specifically for light aeration, while others can handle dense mixtures, but mistreating them can cause damage or poor performance. For instance, over-whisking delicate meringues at high speeds can lead to deflated textures, a mistake many overlook. When it comes to dough mixing, the myth that higher speeds always produce better kneading is misleading—excessive speed can over-develop gluten, resulting in tough bread. It’s essential to recognize that slow, deliberate mixing ensures a better crust and crumb structure. A common trap many fall into is choosing between a hand mixer and a stand mixer based solely on cost or brand reputation rather than understanding their true capabilities. Research shows that improper attachment selection or technique is responsible for up to 30% of baking failures, emphasizing the importance of nuanced knowledge. If you’re aiming for bakery-quality results, mastering the subtle distinctions—like the timing, speed, and type of attachment—can elevate your baking significantly. You might wonder, “How can I tell if my mixer is suitable for dense doughs without overstraining it?” The key lies in understanding your equipment’s horsepower and torque specifications, which many overlook. For advanced bakers, integrating a digital torque meter with your mixer can provide real-time insights, ensuring you don’t push your machine beyond safe limits. According to expert baker and equipment engineer Lisa Robertson, “Using the right attachment at the correct speed not only improves results but also preserves your machine’s longevity.” So, avoid the common mistake of underestimating these nuances—taking the time to learn them pays off in the texture and consistency of your baked goods. Want to master these subtleties? Check out our comprehensive guide on selecting and using mixers effectively. Have you ever fallen into this trap? Let me know in the comments.
Implementing a Routine for Its Longevity
To keep your baking equipment such as stand mixers and dough hooks performing at their best, establishing a regular maintenance schedule is essential. Personally, I make it a point to thoroughly clean and inspect my tools after every baking session. This prevents residue buildup that can lead to motor strain or attachment wear over time. For example, promptly removing flour and batter residues from attachments minimizes corrosion and keeps the motors running smoothly. Regularly checking the power cords and switches ensures safety and avoids unexpected breakdowns. Investing in a dedicated brush set to clean those stubborn nooks within your mixer can significantly extend its lifespan. Want to prevent costly repairs? Follow this comprehensive guide on maintenance tailored for baking enthusiasts.
Tools I Recommend for Long-Term Performance
Over the years, I’ve found that certain tools make maintenance easier and prolong equipment life. For example, using silicone spatulas when cleaning or scraping your mixer helps prevent scratches on plastic parts, which could harbor bacteria or cause damage. An ultrasonic cleaner has also proven invaluable in deep-cleaning attachments like dough hooks and beaters—removing residual flour and grease more effectively than manual scrubbing. Additionally, investing in a high-quality gear lubricant approved for kitchen appliances can prevent gear wear in your stand mixer when used periodically as per the manufacturer’s instructions. Recent advancements in smart diagnostics, like Bluetooth-enabled mixer monitors, are beginning to provide maintenance alerts based on usage patterns, allowing proactive servicing. These innovations are likely to become standard, ensuring mixers last well beyond their warranty periods. Curious about optimizing your tools? I recommend trying out a digital torque sensor while operating your mixer—this helps you understand if the motor is under undue stress, an important factor in maintenance. According to a detailed technical review by industry expert Mike Johnson, «Monitoring torque in real-time can preempt motor burnout, especially when kneading dense doughs.» Take this tip and see how it can transform your baking tenure.
How do I maintain my baking tools over time?
Keeping your baking equipment in top shape doesn’t require complex procedures—just consistent habits and knowledge. Always refer to your user’s manual for specific cleaning and lubrication guidelines. For instance, some stand mixers benefit from periodic lubrication of their gears with manufacturer-approved oil—consult this expert guide for detailed instructions. Avoid overloading your machine, as it can accelerate wear and tear, and regularly inspect attachments for signs of fatigue or damage. Remember, small preventative measures like wiping down switches and knobs with a damp cloth can prevent dirt accumulation that hampers functionality. Additionally, storing equipment in a dry, temperature-controlled environment protects electronics and motors from humidity and temperature fluctuations. As technology advances, staying updated with the latest maintenance practices—such as using the right lubricants or diagnostic tools—can drastically enhance your equipment’s lifespan. I encourage trying out a dedicated cleaning tool like ultrasonic cleaners or torque sensors—they provide precise insights into your tools’ health. This proactive approach saves money and ensures consistent baking quality, making your investment in good equipment truly worthwhile.
Lessons the Kitchen Taught Me About Whisk Attachments and Dough
- I’ve realized that rushing through attachments like the whisk or dough hook often leads to subpar results; patience and understanding their distinct roles can elevate your baked goods.
- Discovering that not all mixers handle dense doughs equally taught me to respect my equipment’s limits, preventing burnout and ensuring consistent quality.
- My biggest mistake was believing higher speeds always meant better kneading—turns out, slow and steady wins the bread.
- I’ve learned that the myth of the most expensive machine being the best is misleading; matching your needs with the right tool is key.
- And perhaps most importantly, I found that mastering technique alongside equipment creates the perfect baking symphony—it’s as much about skill as it is about the gear.
Gear I Trust for Baking Success
- The Ultimate Guide to Choosing Your Baking Mixer—This comprehensive resource helped me understand different mixer types and select the one perfectly suited to my baking style.
- Top-rated Stand Mixers in 2024—A must-read for evaluating durability and power, ensuring longevity for my investment.
- Attachment Insights for Baking Enthusiasts—This guide clarified which attachments are essential for various recipes, saving me time and confusion.
- Maintenance Tips from Industry Experts—Practical advice that keeps my equipment running smoothly season after season.
Your Turn to Let Creativity Flourish
Once you’ve got the right tools and techniques in place, the possibilities in your baking journey are endless. Embrace experimentation, learn from each batch, and celebrate your progress—your homemade bread and desserts will thank you. Remember, every master was once a beginner, and the key is to keep pressing forward. Ready to take your baking to the next level? Dive into our guides and let your culinary passion soar!
What was the most surprising thing you learned about using your mixer or attachments? Share your experience below—I’d love to hear your story!
|
I can definitely relate to the initial frustration of dealing with sticky or unevenly mixed dough. When I first started baking bread, I underestimated the importance of choosing the right mixer, especially the significance of a powerful dough hook. I learned the hard way that a less sturdy hand mixer simply couldn’t handle dense doughs, leading to overworking my arm and inconsistent results. Since upgrading to a good stand mixer with a high torque motor, my bread is much more uniform, and I spend less time battling with the mixture. One thing I’ve found helpful is pre-measuring ingredients carefully and gradually increasing the mixer speed—this prevents splattering and overworking the gluten. How have other bakers found the best way to test if their existing mixer can handle dense doughs without overstraining it? Are there particular features or specs we should look for to ensure longevity and performance? Would love to hear more tips or personal experiences on this.
Reading through this post really struck a chord with me, especially about choosing the right mixer based on your baking goals. I used to think that more powerful meant better, but over time I’ve learned that understanding the specific attachments and their proper use is just as crucial. For instance, I found that a high-torque stand mixer with a good dough hook really transformed my bread baking—earlier, I was overworking my hand mixer, which led to uneven textures and lots of frustration. Also, I’ve started experimenting with different speeds—initial low speeds to prevent splattering and gradual adjustments—this seems simple, but it makes a huge difference. Has anyone else tried using a digital torque meter to monitor if their mixer’s under strain during dense doughs? I’d love to hear how you prevent overloading your appliance while still achieving a perfect knead. It’s fascinating how small adjustments in technique and equipment handling can really elevate our baking outcomes.