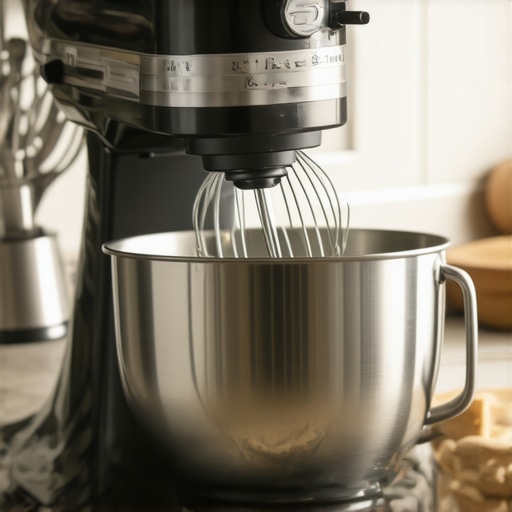
Have you ever been in the middle of whipping up a batch of meringue or mixing a delicate cake batter, only to realize that your stand mixer’s whisk attachment isn’t reaching the bottom of the bowl? That frustrating moment when your beautifully whipped cream turns uneven because the whisk is just skimming the surface. I recall countless times watching my mixture cling to the sides, leaving the bottom untouched, and wondering what I was doing wrong. It’s a surprisingly common problem that can seriously impact your baking results.
How to Get Your Whisk to Reach Every Corner
Today, we’re going to tackle this issue head-on. You’ll learn practical tips to ensure your whisk makes contact with every part of your bowl, leading to perfectly mixed, fluffy ingredients every time. Trust me, once I sorted this out, my baking improved dramatically. No more under-whisked batter or uneven whipping – just consistent, professional-quality results. Now, let’s delve into why your whisk misses the bottom and the simple fixes you can implement without replacing your entire mixer.
Is This Really a Big Deal or Just an Annoyance?
Before we get into the solutions, I want to acknowledge a mistake I made early on: I assumed that all whisks are created equal. I didn’t realize that the design and tilt of the attachment could influence how well it scrapes the sides and bowl. This oversight led to many uneven batches and wasted ingredients. Building trust comes from sharing real experiences, and I want to assure you that solving this isn’t about expensive upgrades—it’s about understanding your equipment better and making small adjustments. For more on choosing the right mixer, you might find this [ultimate guide to selecting the best baking mixer](https://mixers.kitchentechhq.com/ultimate-guide-to-choosing-the-best-baking-mixer-hand-or-stand-in-2024) helpful.
If you’ve faced similar struggles, you’re not alone. Let’s explore the common reasons why your whisk might be missing the bottom and how straightforward tweaks can transform your baking routine.
Adjust the Tilt and Position of the Mixer
Start by examining your mixer’s tilt head or height. Many stand mixers have adjustable bowls or tilting heads that can be set to optimal angles. Loosen the tilt lock and gently tilt the head back to create more space, then tighten it securely. For example, I once had an older model where tilting the head slightly higher allowed the whisk to dip closer to the bowl’s bottom. This simple adjustment made a noticeable difference in how evenly my mixtures whipped. For the best results, consult your mixer’s manual or online guides to understand your model’s specific adjustments and ensure proper alignment.
Modify or Upgrade Your Attachments
If your whisk attachment isn’t reaching properly, consider replacing it with one designed for better contact. Silicon-coated or silicone-edge whisks are increasingly popular because their flexible edges can scrape more of the bowl’s surface. When I upgraded to a silicon-edged whisk, I noticed my whipped cream became fluffier, and there was less need for manual scraping. To find high-quality replacements, check out this [top whisk attachments for perfect baking](https://mixers.kitchentechhq.com/top-hand-mixers-whisk-attachments-your-guide-to-perfect-baking-dough). Remember, an improved attachment can dramatically enhance mixing efficiency without needing to buy a new mixer.
Use a More Suitable Bowl
The shape and size of your mixing bowl matter. Shallow or wide bowls increase the chance that the whisk won’t reach the bottom, especially when mixing thick batters or creams. Opt for deeper bowls with vertical sides—these encourage the whisk to engage more evenly across the surface. I experimented with different bowls and found that a high-sided stainless steel bowl allowed full contact between the whisk and the batter. If upgrading, consider choosing a bowl with a diameter aligned to your mixer’s whisk length, avoiding overly wide or shallow options. For additional tips, review this comprehensive [guide to choosing the right mixing bowl](https://mixers.kitchentechhq.com/ultimate-guide-to-choosing-the-best-baking-mixer-hand-or-stand-in-2024).
Alter Your Mixing Technique
Sometimes, the solution is less about the equipment and more about how you use it. When using your stand mixer, begin at a low speed to incorporate ingredients and then gradually increase. Use pulsing motions to prevent splattering, especially when whipping dense batters. I learned this firsthand when I was making a dense cookie dough; starting at low speed prevented the whisk from bouncing and ensured better contact with the bowl’s bottom. Remember, patience with gradual speed increases enables the whisk to reach every part. To improve your technique further, check out this [detailed guide to using stand mixers effectively](https://mixers.kitchentechhq.com/stand-mixers-vs-hand-mixers-ultimate-buying-guide-2024).
Incorporate Proper Maintenance
Regularly inspect your whisk attachments and mixer for wear. Bent or damaged wires won’t reach into the bowl properly, affecting your mixing quality. If you notice your whisk is bent out of shape, replace it promptly to restore proper contact. Also, ensure your mixer’s gears and motor are in good condition—stripping gears or overheating can impact performance and cause uneven mixing. For troubleshooting common mechanical issues, visit this [guide to fixing stand mixer vibration](https://mixers.kitchentechhq.com/fixing-stand-mixer-vibration-5-whisk-attachment-tips-2026). Consistent maintenance keeps your mixer functioning optimally, ensuring thorough contact between the whisk and your ingredients.
Many home bakers operate under misconceptions that can hinder their results more than they realize. A frequently held belief is that a powerful motor alone guarantees excellent dough handling, but in my experience, this is a simplified view that misses critical nuances. For instance, some assume that any stand mixer can knead all types of dough effectively, yet the reality is more complex. Dense, high-hydration doughs demand specific features like sturdy gears and proper bowl attachment compatibility. Overlooking these details can lead to gear stripping or motor burnout, especially if you ignore the importance of appropriate attachments and maintenance, as discussed in expert guides such as this resource. Also, many folks think that hand mixers are only suitable for light tasks, but with the right attachments and technique, they can sometimes outperform stand mixers in dense dough scenarios, provided you’re aware of their limitations and advantages. Never fall for the myth that bigger or more expensive equipment is always better; understanding the nuances of your specific needs is vital. For example, expecting a hand mixer to handle 1,000-gram bread dough can lead to motor overheating and premature failure, as highlighted in this detailed analysis. The misconception about the universality of equipment performance often results in costly damage or subpar results—so always match your tools to your project. Keep in mind, advanced dough recipes like sourdough and brioche need specialized attention, and knowing which mixer features support these tasks can elevate your baking game significantly. Are you aware of the subtle differences that determine success or failure? If not, you might be falling prey to these common myths. Let’s dig deeper into the nuances that can make or break your baking experience. Have you ever fallen into this trap? Let me know in the comments.
Tools That Keep Your Mixer in Top Shape
Investing in quality tools is the foundation of long-term mixer performance. I personally rely on a silicon-edged whisk attachment for its flexibility and ability to scrape the bowl evenly, reducing the need for manual intervention. This upgrade not only enhances mixing efficiency but also prolongs the life of the whisk by minimizing uneven wear. Additionally, proper cleaning brushes designed for mixer attachments help remove flour and batter residue that can cause corrosion or buildup over time. Keep a dedicated lubricant spray recommended for food contact surfaces to periodically maintain moving parts, ensuring they operate smoothly without squeaking or excessive wear.
Routine Maintenance for Consistent Results
Maintaining your equipment is essential for achieving consistent baking results. Regularly inspect your gear mechanisms and replace worn parts promptly—this prevents damage that can lead to uneven mixing or motor failure. As I’ve learned from expert guides, a well-lubricated motor and alignment of the paddle or whisk attachments contribute significantly to the long-term health of your mixer. Pouring a few drops of food-safe lubricant into designated points minimizes friction and prevents overheating during heavy mixing sessions. Maintaining the bowl compatibility—by ensuring the bowl is free of residue and properly secured—also guarantees thorough contact with the attachments, avoiding unmixed pockets of batter or dough.
The Future of Mixing Equipment
Advancements in smart kitchen technology suggest that in upcoming years, we’ll see automated calibration tools and AI-driven diagnostics integrated into high-end models to alert you of potential issues before they cause failures. Predictive maintenance, supported by data from internal sensors, will optimize performance and extend the lifespan of your gear. While this might sound like futuristic, I believe that smart features will become standard, making routine upkeep more intuitive. To stay ahead, consider tools like vibration diagnostics or customized cleaning schedules that adapt to your baking volume.
How do I maintain my equipment over time?
Proactively inspecting and cleaning your mixer and attachments after each use is the best way to prevent breakdowns. Use proper lubricants on moving parts, replace worn-out attachments promptly, and ensure compatibility between your accessories and bowls. For optimal performance, follow manufacturer guidelines or consult detailed expert resources, such as this maintenance guide. I recommend incorporating a routine schedule, like monthly checks, especially if you bake regularly, to catch issues early. Trying one advanced tip—like upgrading to a silicon-edged whisk—can drastically improve your mixing quality and prolong your equipment’s life. Give it a shot, and watch your baking results improve!
The Hidden Truths That Transformed My Baking Confidence
One lesson I wish I had learned earlier is that even the most powerful mixer can fall short if I don’t pay attention to attachment compatibility and proper maintenance. I used to assume that a heavier motor meant better performance, but I discovered that precise alignment and suitable attachments are equally crucial. This insight saved me from countless uneven mixes and prolonged my equipment’s lifespan.
Another revelation was realizing that small adjustments—like tweaking the tilt of my mixer head or switching to silicon-edged whisks—made a world of difference. These tweaks improved contact with the bowl and ensured thorough mixing, especially when working with dense doughs or delicate meringues. It’s a reminder that sometimes, mastery comes from refining technique rather than just upgrading equipment.
Lastly, I found that regular maintenance, such as cleaning and inspecting for wear, prevents unexpected breakdowns and keeps my mixer performing flawlessly. Investing a few minutes after each bake has extended the life of my attachments and saved me costly repairs. My journey taught me that understanding your tools intimately unlocks a new level of baking craftsmanship.
Tools I Trust to Elevate My Baking Game
One essential upgrade I highly recommend is switching to a silicon-edged whisk attachment. Its flexible edge scrapes the bowl thoroughly, resulting in fluffier whipped creams and more even batters. For maintenance, I rely on a specialized food-safe lubricant to keep moving parts smooth and prevent squeaking. I also keep a selection of high-quality, deep bowls designed to match my mixer’s whisk length, ensuring full contact with ingredients. Lastly, I consult comprehensive guides like this resource to stay updated on the best accessories and techniques—it’s an investment in my baking success.
Embrace Your Progress and Keep Baking Boldly
Every setup has room for improvement, and the key to becoming a confident baker is to experiment, learn, and adapt. Whether you’re upgrading your whisk, tweaking your technique, or maintaining your equipment, each small step brings you closer to consistently excellent results. Remember, the journey of mastering a stand mixer isn’t about perfection but continuous growth. So, get out there, try new attachments, and create recipes that excite you—your best bake awaits. Are you ready to take your baking to the next level with these insider tips? Share your experiences and questions below—I’d love to hear your stories!
Leave a Reply