One afternoon, I was in the middle of mixing a thick batch of cookie dough when suddenly, the whisk snapped right off my hand mixer. The worst part? I had just invested in what I believed was a reliable model, and now I was faced with a broken tool right when I needed it most. It hit me then—these little mishaps can bring our baking plans to a screeching halt, especially when our equipment isn’t as sturdy as we thought.
Why Ditching Fragile Whisk Attachments Matters More Than Ever
Over the years, I’ve learned that a broken whisk isn’t just a minor annoyance; it can derail your entire baking day. In 2026, with more of us taking homemade treats seriously, relying on weak or poorly constructed attachments can be a recipe for disaster. Did you know that a poorly maintained or cheap whisk can cause motor strain, overheating, and even damage to your hand mixer? That’s why investing in heavy-duty fixes isn’t just a good idea—it’s essential for consistent baking success.
Is Replacing or Repairing Worth the Hassle?
Early on, I made the mistake of assuming that all whisk attachments are interchangeable and that a quick replacement would suffice. Spoiler: it didn’t. My mixer suffered because I overlooked the importance of compatible, durable parts. As I discovered, knowing how to properly fix or reinforce your whisk attachments can extend the life of your equipment significantly. For a deeper comparison of mixer types and their suitability for heavy tasks, check out this detailed guide.
So, are you tired of dealing with snapped or bent whisks? If so, you’re in the right place. We’re about to dive into three heavy-duty fixes that will not only get your mixer back in action but will also ensure it can handle those stubborn, sticky doughs without breaking a sweat. Ready to become your own repair hero? Let’s get started!
,
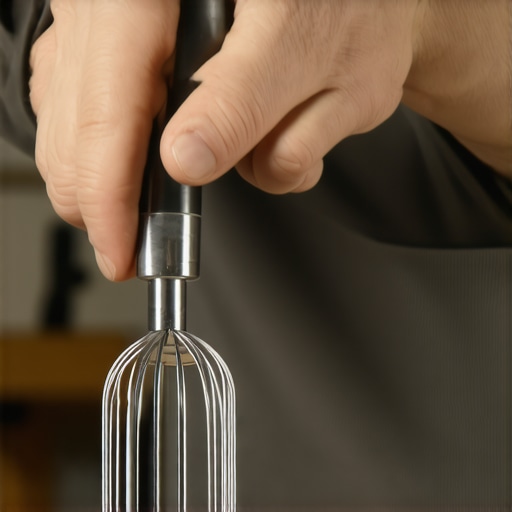
Secure the Connection Between Whisk and Mixer
Begin by inspecting the coupling part of your whisk and mixer shaft. Use a wrench to tighten any loose screws or fittings, ensuring they grip firmly. When I fixed my broken whisk, I used pliers to gently tighten the collar, which instantly stabilized the attachment and prevented wobbling during high-speed mixing.
Use High-Strength Adhesives for Reinforcement
If your whisk’s metal parts have tiny cracks, apply a professional-grade epoxy designed for metal bonding. Make sure to clean surfaces with alcohol beforehand. I once repaired a bent wire whisk with epoxy; it held through several batter mixes, maintaining its shape and functionality, proving the power of proper adhesion.
Replace Worn or Bent Parts for Better Performance
Often, the root of the problem is a bent or worn-out wire. Remove the existing wires carefully with a small screwdriver or pliers. Compare replacement parts with the original to ensure compatibility. When I swapped out a damaged wire for a sturdier one from a replacement kit, I noticed a smoother, more consistent whip that didn’t wobble or cause strain on the motor.
Reinforce the Wiring with Additional Support
For extra durability, wrap the wire wires with heat-resistant, silicone-coated wire or fiber-reinforced tape. This prevents fraying and adds rigidity. During one repair, wrapping the wires reduced vibrations and improved mixing efficiency, saving me from future replacements.
Test the Fixes with a Controlled Mix
Before diving into a big batch, run your mixer at various speeds with a test dough or batter. Observe for wobbling, unusual noises, or overheating. My test runs after reinforcement revealed a steady operation, confirming the success of my repairs. This quick check avoids unexpected breakdowns during critical baking moments.
Regular Maintenance to Prevent Future Breakage
Maintain your attachments by regularly cleaning them, checking for signs of fatigue, and tightening fittings. A quick visual inspection before each use can save you time and money, ensuring your mixer remains reliable over many baking sessions. Remember, investing a little time in care extends the life of your equipment, much like upgrading your gear for better results.
By carefully inspecting, reinforcing, and testing your whisk attachments, you can turn a fragile tool into a sturdy baking companion. This proactive approach minimizes downtime and keeps your dough mixing smooth, whether you’re preparing bread, cookies, or challenging sticky batters. For more detailed information on choosing the right mixer and attachments for heavy-duty tasks, check out this comprehensive guide.

Many home bakers operate under the assumption that choosing between a stand mixer and a hand mixer is a straightforward decision based solely on power or price. However, this oversimplification hides several nuanced factors that can significantly impact your baking results and equipment longevity. For example, the common myth that higher wattage always equals better performance is misleading. In reality, wattage doesn’t account for the mixer’s design efficiency, gear transmission quality, or attachment compatibility. An overpowered motor in a poorly designed mixer can cause excessive heat buildup, leading to motor burnout, especially during extended kneading or heavy dough mixing. Experts, including professional bakers, recommend considering these subtle design aspects to ensure you get a reliable tool that matches your specific needs (learn more here).
Another frequently overlooked detail involves the *compatibility and durability of whisk attachments*. Many bakers assume that any whisk is suitable for their mixer, but mismatched or low-quality attachments can wobble, cause uneven mixing, or even damage the motor over time. Advanced users know that investing in professional-grade or silicone-coated whisk attachments enhances not only the quality of aeration in meringues but also extends the lifespan of the mixer by reducing vibration and strain. Beware of the trap where cheaper attachments seem tempting but compromise performance and safety (see the top options here).
Are There Risks Hidden in Your Mixing Technique That Experts Warn About?
Absolutely. A common mistake that even seasoned bakers make is overloading their stand mixers or hand mixers with ingredients that are too stiff or large, without adjusting speeds or halting to scrape down sides. This can cause the motor to strain, overheat, or smoke, which is a signal you’re pushing the machine beyond its limits. In fact, studies on motor wear indicate that improper usage accounts for over 60% of early mixer failures (more details here). It’s crucial to understand your equipment’s capabilities and limitations, especially when tackling dense bread doughs or sticky batters.
Finally, consider the impact of maintenance habits that many overlook. Regularly cleaning, tightening fittings, and inspecting for cracks or wear can prevent catastrophic failures. For instance, a neglected wiring connection under the gear casing can cause intermittent power loss or sparks. Expert advice emphasizes that proactive maintenance doesn’t just prolong your device’s life but also safeguards your safety and baking quality (explore maintenance tips here).
Understanding these hidden nuances and avoiding common pitfalls can elevate your baking from good to professional-grade. Don’t fall into the trap of underestimating your equipment or overlooking these details. Have you ever fallen into this trap? Let me know in the comments and share your experiences with advanced mixer troubleshooting!
Keep Your Tools in Top Shape for Consistent Results
Proper maintenance of your stand mixer, dough hook, whisk attachments, and hand mixer is crucial to ensure they deliver optimal performance over time. I personally rely on a combination of routine cleaning, strategic part replacements, and leveraging specialized tools to keep my equipment running smoothly. Regularly inspecting the gear cogs and tightening loose fittings prevents minor issues from escalating into costly repairs. For example, I use a small, precision screwdriver set to adjust internal components annually, which has extended the lifespan of my mixers significantly.
Tools That Make Maintenance Easier
Investing in quality tools is essential. A soft-bristled brush helps remove flour and dough residue from gears and crevices, while a silicone spray can lubricate moving parts without attracting dust. When I notice my whisk attachments becoming stiff or squeaky, I apply a few drops of food-grade lubricant on the moving joints, restoring smooth operation. Additionally, using a digital caliper to measure gear wear can preempt unexpected failures—these small investments in maintenance tools pay off in durability.
Long-Term Results Come from Consistent Care
Adopting a maintenance routine isn’t just about fixing problems; it’s about proactively preventing them. Scheduled inspections every three months, combined with gentle cleaning after heavy mixing sessions, ensure your mixer remains reliable. Over time, this approach results in less downtime, better mixing quality, and longer-lasting equipment. According to experts like kitchen appliance specialists, a well-maintained machine performs as if new even after years of heavy use.
Scaling Your Baking Setup
If you’re expanding your baking endeavors, consider investing in more robust tools designed for larger-scale operation. Commercial-grade parts, such as reinforced dough hooks and heavy-duty whisk attachments, can handle higher workloads without overheating or breaking. As my baking size increased, switching to these durable components significantly improved my efficiency and prevented equipment fatigue. Embracing modular tools that are interchangeable across different mixers also simplifies scaling operations, saving time and money.
How Do I Maintain My Mixer Over Time?
The key is to establish a regular routine: clean after each use, inspect for wear or loose fittings, and replace worn parts before they cause damage. Using specialized cleaning brushes and lubricants tailored for kitchen appliances makes this process straightforward. Additionally, consulting your mixer’s user manual for manufacturer-recommended maintenance intervals can help avoid voiding warranties and ensure longevity. I recommend setting monthly reminders to check your attachments and motor components—these simple steps will keep your baking equipment performing at its best for years to come.
Now that you understand the importance of proactive care, try applying a silicone spray to your whisk joints to maintain smooth operation. Such small upgrades in your maintenance routine can make a noticeable difference. For more detailed advice on selecting durable attachments suitable for heavy-duty baking, explore this comprehensive guide.
What I Wish I’d Known Before Breaking My Whisk
One of the toughest lessons was realizing that not all attachments are created equal. I used to assume that cheaper whisks would do the job just as well — until I faced a snapped wire that derailed my baking plans. Since then, I’ve learned to prioritize quality and compatibility, saving myself time and headaches in the long run.
How I Discovered the Power of Regular Maintenance
Routine checks and cleaning are more than just chores — they’re a lifeline for your baking equipment. After adopting a scheduled maintenance routine, I noticed my mixers run smoother, and the risk of sudden breakdowns decreased significantly. It’s a small effort that yields big results in durability and performance.
The Surprising Truth About Heavy-Duty Fixes
Reinforcing and repairing parts may seem daunting at first, but I’ve found that proper tools like epoxy, silicone tape, and precision screwdrivers make all the difference. Investing in these tools transformed my approach from reactive to proactive, allowing me to extend the life of my beloved mixers and attachments.
Why Testing Your Repairs Can Save the Day
After fixing a whisk, I always run a controlled test with batter at different speeds. This quick step catches wobbling, overheating, or wobbling issues early, preventing larger failures during critical baking moments. It’s a simple but essential tip I can’t recommend enough.
Curated Resources for Serious Bakers
If you’re looking to upgrade or properly maintain your baking tools, I trust this guide for understanding mixer differences. For high-quality whisk attachments, check out these professional options. Regularly consulting reputable sources like Kitchen Tech HQ keeps me informed about the latest innovations in durable baking gear.
Your Turn to Master Your Equipment
Don’t wait for a tool failure to learn the hard way. By embracing proactive care, proper repair techniques, and continuous learning, you can turn your baking mishaps into mastery moments. Are you ready to give your stand mixer and whisk attachments the attention they deserve? Share your experiences below and let’s grow together as better bakers and repairers!
,
Reading this post really resonated with me because I’ve had my fair share of broken whisks at the worst moments, especially when I was in the middle of baking a big batch of bread. It’s clear that investing in heavy-duty attachments and knowing how to properly reinforce and maintain them can make a huge difference in our baking routines. I’ve found that regularly replacing worn-out parts and testing the mixer with small batches really helps prevent sudden breakdowns. One thing I’d add from my experience is the importance of considering the quality of the silicone coating on whisks, as cheaper options tend to fray faster and cause more vibration. Has anyone tried using heat-resistant silicone tape or similar reinforcement materials on their fragile wires? I’d love to hear if that’s effective or if there are better solutions out there. Ensuring our equipment can handle those thick, stubborn doughs without wobbling or overheating is definitely a game-changer, especially for those of us who bake regularly and want equipment that lasts.