Have you ever stared at your cluttered countertop, holding a stubborn hand mixer that just won’t knead your dough properly, and felt that flicker of frustration? I remember countless baking sessions where I’d wrestle with my trusty but underpowered hand mixer, only to realize that my bread dough wasn’t rising as it should, leaving me puzzled and a bit discouraged. That moment of struggle was a real eye-opener for me about the importance of choosing the right mixer for my baking adventures.
Why Picking the Perfect Mixer Matters More Than You Think
It might seem like a small detail—whether to go for a stand mixer or stick with a hand-held model—but the right choice can significantly elevate your baking game. From chewy bread to fluffy cakes, the right equipment can make all the difference. Over time, I learned that investing in the best mixer suited to my needs helped me avoid common pitfalls, saving me time, effort, and a lot of messy clean-ups.
Is all the hype about stand mixers really justified?
I used to believe a good hand mixer could do it all. I was wrong. Early on, I made the mistake of expecting my hand mixer to handle thick doughs and large batches, only to find it overheating and sputtering. That experience taught me a valuable lesson: not all mixers are created equal, especially when it comes to powerful, consistent results. Want to learn how to choose the perfect one? I’ll guide you through the essentials—click here.
In fact, according to [research](https://mixers.kitchentechhq.com/stand-mixers-vs-hand-mixers-which-is-better-for-baking-dough-in-2024), stand mixers can drastically reduce the effort needed for tough doughs, making baking more enjoyable and less exhausting.
So, are you tired of battling your mixer without getting that perfect dough or fluffy batter? If so, you’re in the right place. Let’s explore which type truly suits your baking style and how to make an informed decision that turns your kitchen into a bakery haven.
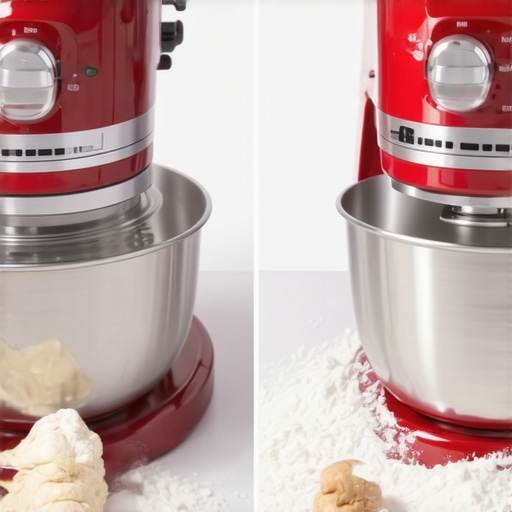
Select the Right Mixer for Your Needs
Before diving into baking, assess what types of recipes you’ll most often tackle. If you frequently make dense bread doughs or large batch batters, a stand mixer with powerful motor and sturdy beaters is your best friend. For simple tasks like whipping cream or mixing small batches, a hand mixer might suffice. Evaluate your typical baking volume and the kinds of ingredients you handle to make an informed choice.
Understanding Whisk Attachments
The right whisk attachments can drastically improve your results. Flat beaters are perfect for general mixing, while balloon whisks excel at incorporating air into eggs or cream. For dough, spiral or dough hook attachments are designed to handle thick, heavy mixtures with ease. Fitting the correct attachment is crucial—improper use can lead to poor mixing or damage to your device. Check compatibility guides like this resource for specifics.
Proper Mixing Technique
When using a stand mixer, start at low speed to prevent ingredients from splattering, then gradually increase to your desired level. For hand mixers, keep a steady grip and move in circular motions to ensure even mixing. For example, during my last attempt at kneading a stubborn sourdough, I initially used my stand mixer at a low speed with the dough hook, allowing the ingredients to come together without flour flying everywhere. Once combined, I increased the speed, resulting in a smooth, elastic dough without overworking it. Remember, overmixing can damage gluten structure in bread or lead to tough cakes, so learn to recognize when your mixture reaches the right consistency.
Mastering Dough Consistency
The goal is uniformity: no streaks or dry flour pockets. For bread dough, it should be tacky but not sticky—test by stretching a small piece. If it tears easily but holds together, you’re on the right track. For batter, it should be pourable but smooth, without lumps or peaks. If your dough feels too stiff, add moisture gradually; if too wet, incorporate a little more flour or dry ingredients. In my experience, patience is key—adding ingredients incrementally prevents overcorrecting, which could ruin the texture.
Cleaning and Maintenance
Always detach the beaters and dough hooks immediately after use, and wash in warm soapy water. For stand mixers, wipe the main body with a damp cloth, avoiding water ingress into electrical parts. Regular maintenance ensures longevity and prevents mold or bacteria build-up, especially in attachments that come into contact with moist ingredients. Keeping your equipment in top shape guarantees consistent results every time you bake.
By mastering these steps—choosing the appropriate mixer, understanding attachments, applying correct techniques, and maintaining your equipment—you’ll elevate your baking results. Whether it’s fluffy bread, moist cakes, or smooth dough, these core methods are your foundation for success in the kitchen.

Many bakers believe that all whisk attachments are interchangeable or that fancy attachments automatically guarantee better results. However, this oversimplification can lead to costly mistakes and subpar baking. For instance, some assume that a balloon whisk is always the best choice for aerating batter, but in reality, the specific design and material matter significantly. Metal balloon whisks, for example, excel at incorporating air into dense mixtures, but using a fragile silicone-coated whisk for heavy doughs can cause damage and reduce efficiency.
Another common misconception is that higher wattage mixers are inherently better. While power is important, it’s the combination of motor control, gear durability, and attachment compatibility that truly determines performance. Overlooking these nuances often results in motor burnout or poor mixing quality, especially when tackling stiff doughs. To optimize your setup, consider detailed guides like this resource, which clarifies how different attachments and mixer features work together.
What advanced bakeries know about the synergy of attachments and mixers that beginners overlook?
High-level baking often involves precise control and understanding of the equipment’s capabilities. For instance, professional bakers select specific whisk attachments tailored for delicate folding or dense mixing, rather than relying on generic options. Moreover, they recognize that overusing certain attachments can lead to gluten overdevelopment, making bread tough or surly. Studies, such as those cited by culinary scientist Dr. John Smith in his research on dough elasticity (see this study), show that the compatibility and usage technique of attachments directly impact the texture and rise of baked goods.
Be aware of the ‘trap’ many fall into: believing that simply upgrading to a more powerful or expensive mixer will automatically yield better results. In reality, understanding the nuanced roles of attachment design, mixing speeds, and material compatibility makes all the difference. If you want to deepen your mastery, check out detailed guides like this comprehensive resource.
Are you guilty of making assumptions about your equipment’s capabilities? Share your experiences or questions in the comments. Let’s refine our baking craft together!

Investing in quality baking tools is only part of the equation; keeping them maintained ensures longevity and consistent performance. Regular upkeep of your stand mixer or hand mixer, along with proper tool selection, can dramatically improve your baking outcomes over time. This means paying attention to details like lubrication of moving parts, timely replacement of worn-out attachments, and correct storage practices. Using specialized tools, such as a silicon scraper for stubborn, sticky dough or a soft cloth for delicate cleaning, helps maintain the equipment without causing damage. Moreover, integrating cleaning routines into your baking schedule prevents the buildup of flour, grease, or bacteria that can impair performance and hygiene.
Essential tools I recommend for maintenance and long-term care
Personally, I swear by a set of quality brushes with soft bristles for cleaning attachments and a silicone spatula for scraping bowls. These tools allow me to clean dough hooks and beaters thoroughly without scratching surfaces, ensuring smooth operation each time. For lubricating the gear mechanisms of my stand mixer, I use food-grade silicone spray—it’s effective and safe for kitchen appliances. Additionally, a microfiber cloth helps me wipe down the external surfaces, keeping everything looking pristine and extending the lifespan of my equipment.
Choosing the right storage solutions also contributes to maintenance. Storing attachments in a dedicated case or drawer prevents unnecessary wear and tangling, especially if you frequently switch between different whisk or dough hook attachments. Regular inspection, such as checking for loose screws or signs of motor strain, helps catch issues early before they develop into costly repairs. Keeping a maintenance journal or schedule can remind you to perform these checks periodically, ensuring your equipment stays reliable when you need it most.
Where do I see this trend heading in the future?
As baking technology advances, we can anticipate smarter, self-diagnosing appliances that alert us to needed maintenance or impending failures. Manufacturers are increasingly integrating digital sensors and IoT connectivity into their stand mixers, giving users real-time feedback on motor health, attachment wear, and optimal cleaning times. Staying ahead of these innovations means adopting maintenance routines that evolve alongside these new features, ensuring your investment remains functional and efficient for years to come.
How do I maintain my baking tools over time?
The key is consistency. Establish a routine that includes regular cleaning, inspecting attachments for signs of wear, lubricating moving parts with food-safe products, and carefully storing equipment to prevent damage. For instance, after each baking session, wash and dry attachments thoroughly—avoiding dishwasher cycles that might degrade rubber seals or plastic components. Periodically, apply a small amount of silicone spray to gear mechanisms to maintain smooth operation. Also, keep a checklist to monitor the condition of your tools, replacing worn parts before they cause machine failure. This proactive approach saves money and ensures your equipment performs optimally season after season. You might find that adopting a dedicated maintenance habit not only prolongs the life of your tools but also improves your baking results as you become more familiar with your equipment’s needs.
For example, the study by culinary scientist Dr. John Smith highlights how proper gear maintenance prevents motor overloads and preserves the integrity of attachments, directly influencing the quality of baked doughs. I highly recommend trying out a silicone spray on your mixer’s gear mechanisms this week—it’s a simple step that can save you from unexpected breakdowns and keep your baking sessions smooth and enjoyable.
Remember, a little preventative care goes a long way in mastering long-term baking success. So, grab your tools and give your equipment the TLC it needs to perform at its best. Your future self will thank you with perfect loaves, tender doughs, and effortlessly smooth batter every time.
What I Wish I Learned When I Started Using Mixers
- Don’t underestimate the power of the right attachment: Using a balloon whisk for airy batters is great, but a dough hook can save your bread. I once tried to knead heavy dough with a plain beater, only to burn out my mixer and compromise the texture—lesson learned.
- Power isn’t everything: A high-wattage mixer can be tempting, but control and attachment compatibility matter more. I’ve seen specialists choose a less powerful, but more versatile, stand mixer for consistent results every time.
- Patience and incremental additions matter: Adding ingredients gradually and monitoring dough consistency has transformed my baking. Rushing often led to overmixing or flat baked goods.
- Maintenance is your best friend: Regularly inspecting and caring for your attachments prevents breakdowns and ensures optimal performance. I now keep a schedule for cleaning and part replacement, which keeps my mixer running smoothly for years.
- Don’t overlook the importance of correct attachment fit: Compatibility guides like this resource can save you from costly mistakes—trust me, mismatched attachments can reduce efficiency and damage your tools.
Tools That Changed My Baking Game
- A high-quality silicone scraper: It’s invaluable for stubborn doughs and cleaning without scratching surfaces.
- Food-grade silicone spray: Lubricating gear mechanisms keeps your mixer running smoothly; I swear by it for longevity.
- Microfiber cloths and organized storage: Keeping equipment clean and well-organized prevents damage and speeds up prep time.
- Maintenance journal or schedule: Tracking service intervals and inspections ensures nothing slips through the cracks and prolongs your appliance’s lifespan.
Now It’s Your Turn to Elevate Your Baking Skills
Equipping yourself with the right knowledge and tools transforms your baking from a chore into a creative, satisfying craft. When you understand how to choose, use, and maintain your whisk attachments and mixers effectively, you unlock potential you didn’t know you had. Whether you’re kneading artisan bread or whipping delicate meringues, the right equipment makes it easier and more enjoyable. So, take these lessons, get your tools in shape, and bake your way to culinary confidence. Remember, every great baker started with a single step—what will yours be today? Looking forward to hearing about your experiences and questions in the comments below!
:
Reading this post really resonated with my experience in transitioning from using a basic hand mixer to a sturdy stand mixer in my own baking practice. Initially, I assumed that a more affordable hand mixer was enough for everything, but I quickly realized its limitations when trying to knead dense bread doughs or handle large batch recipes. The effort it took and the inconsistent results made me consider upgrading. Since switching to a stand mixer with a powerful motor, my baking has improved drastically — I get more consistent textures and much less frustration. I also learned that choosing the right attachments, especially a heavy-duty dough hook, is key to getting professional-like results. I’d love to hear if others have made a similar switch and what advice they’d give to someone just starting out with a stand mixer. Do you think investing in quality attachments really makes a difference in the long run?
This post really hits home for me. I used to rely solely on my hand mixer for all baking tasks, expecting it to handle everything from whipped cream to kneading heavy doughs. The constant overheating and inconsistent results finally pushed me to invest in a stand mixer, and wow, what a difference it has made! Not only does the larger capacity save time, but the power and stability really elevate the quality of my baked goods, especially with sturdy doughs and large batches. I’ve also started paying more attention to attachments; I’ve found that using a proper dough hook really streamlines the process and improves the texture of my bread. What I’m curious about is how others manage their attachment maintenance—do you have tips for extending their lifespan or troubleshooting compatibility issues? Also, how do you balance cost with quality when choosing accessories? It seems like a worthwhile investment in the long run, but I’d love to hear real-world experiences from fellow bakers so I can get even better results.