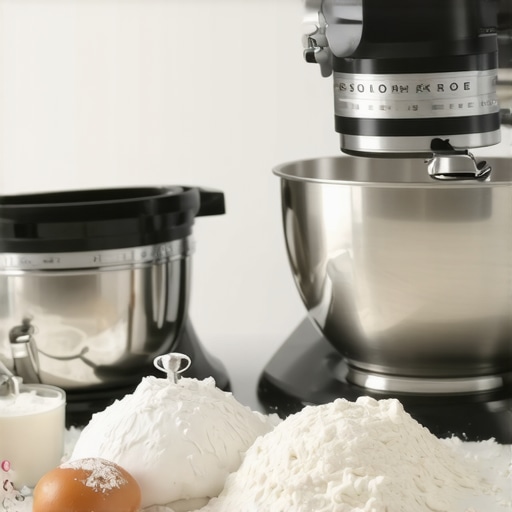
Have you ever been mid-bake, only to realize your trusty hand mixer is struggling with thick dough? Or maybe you finally splurged on a shiny stand mixer, only to find it takes up more space than you anticipated and feels overkill for smaller tasks? I’ve been there. I remember the first time I tried making bread dough with a tiny hand mixer—let’s just say it was a lesson in patience, and not the good kind. That moment made me question whether I needed a full-sized stand mixer or if a hand-held option could handle my baking dreams.
Choosing Between a Stand Mixer and a Hand Mixer: Why It Matters
Choosing the right type of mixer isn’t just about fancy kitchen gadgets. It’s about how much time you want to spend whisking, kneading, and mixing, and what kinds of recipes you’re passionate about. I quickly learned that the decision impacts everything from the texture of your dough to the overall ease of baking. In fact, a good mixer can make or break your baking experience, especially when working with delicate whisk attachments or dense doughs. I’ll guide you through what I’ve learned from my own kitchen experiments, along with some expert insights, so you can decide which appliance suits your needs best.
Is the hype around stand mixers really justified?
Early in my baking journey, I made the mistake of assuming a stand mixer was just a luxury. Turns out, it’s a real game-changer—especially for kneading dough or whipping egg whites. But I also found out that not every stand mixer is created equal, and some are more suited for specific tasks than others. If you’re hesitant, you’re not alone. Many people worry that a stand mixer might be too bulky or expensive for their needs. I’ve been there, and I want to help you avoid the pitfalls I encountered. For instance, I initially bought a cheaper model that couldn’t handle heavy cookie dough, and that was a frustrating experience. To save you from similar mistakes, I recommend checking out this comprehensive guide to choosing the perfect baking mixer. It’s packed with tips that can help you match your kitchen needs with the right equipment.
Now that I’ve shared my own struggles, let’s dig into the practical differences between these two types of mixers, so you can make a confident decision and avoid wasting your hard-earned money or precious baking time.
Set Up Your Equipment Properly
Begin by assembling your mixer and attachments. For a stand mixer, attach the whisk or dough hook as needed, ensuring it clicks into place securely. For hand mixers, insert the beaters firmly into the slots. I once started mixing cookie dough with my stand mixer, only to realize the attachment wasn’t properly secured, causing it to wobble and make a mess. Double-checking attachments before starting saves time and frustration.
Choose the Right Attachment for Your Task
Different recipes require different tools. Use the whisk attachment for airy batters like meringue or whipped cream. Switch to the dough hook for dense bread or pizza dough. For lighter mixing, paddle attachments work well. I once tried whisking egg whites with a paddle, which took forever and didn’t get the fluffy texture I wanted. Knowing which attachment to use makes all the difference in efficiency and results.
Mix with Precision and Control
Start at low speed to combine ingredients gently, then gradually increase to high for aeration. For example, when making whipped cream, I begin on 2-3 speed, then bump up to 8-10 once the mixture starts to thicken. Watch for over-mixing, which can turn your batter into butter or ruin the structure. Use short bursts of power, especially with delicate ingredients, to prevent splatters or overworking your batter.
Manage Your Dough Effectively
Dense doughs like bread or pizza need longer mixing times and often benefit from a stand mixer with a dough hook. I once overmixed a batch of bread dough on high speed with a hand mixer, which caused the gluten to overdevelop, resulting in a tough loaf. For best results, let the mixer run on a slow to medium setting, and monitor the texture regularly. When the dough pulls away from the sides of the bowl and feels elastic, it’s ready.
Clean and Maintain Your Mixers
After each use, detach the beaters or dough hook and wash them thoroughly. Wipe down the main body of your stand mixer with a damp cloth, avoiding water near the motor. Proper cleaning extends your equipment’s life and keeps your baked goods tasting fresh. I learned this the hard way when a neglected attachment caused rust and bad odors in my mixer.
Adjust Speed and Power for Optimal Results
Don’t blindly run your mixer at maximum speed all the time. Use the lowest effective speed for initial mixing, then increase gradually. For instance, when beating egg whites, I start on a slow setting to prevent splattering, then increase to high once bubbles form. This method ensures even mixing and prevents messes.
By mastering these techniques, you’ll leverage the full potential of your mixers, whether you prefer a sturdy stand model or a portable hand-held device. Remember, the key is understanding your mixer’s capabilities and matching them to your recipe’s needs. For further insights on choosing the best equipment, check out this ultimate guide.
Many home bakers fall into traps when choosing or using their mixers, often based on misconceptions that can hinder their baking success. Let’s clarify some of these common myths and reveal the nuanced truths that can elevate your baking game. First off, everyone assumes that a higher wattage or more powerful motor automatically means better performance, but that’s not always true. In fact, a powerful motor can sometimes mean more noise and unnecessary wear if not matched with the correct attachments and usage. Instead, focus on the build quality and the gear reduction system—these determine how effectively the mixer handles dense doughs or delicate whisking. For an in-depth comparison, check out this expert buying guide.
Invest in Quality Attachments and Tools
One of the best ways to ensure your mixers keep working smoothly over time is to use high-quality attachments and accessories. I personally swear by stainless steel whisk attachments, which resist rust and damage better than plastic ones. They also conduct heat better, helping to maintain consistent performance during prolonged whipping sessions. When choosing attachments, always verify compatibility with your specific model, as mismatched parts can cause unnecessary wear or even damage. For detailed guidance, check out this expert resource on selecting the right whisk attachments.
Regularly Lubricate and Clean Your Equipment
Keeping your mixer clean isn’t enough—regular lubrication of moving parts can greatly extend its lifespan. For stand mixers, applying a small amount of food-grade lubricant to the gear mechanisms every few months prevents parts from grinding and wearing prematurely. I prefer to do this during a thorough cleaning session, which also involves inspecting the attachments and the power cord for any signs of wear. Wiping down the motor housing with a damp cloth avoids dust buildup that can interfere with cooling. For detailed maintenance tips, I recommend reviewing this comprehensive guide.
Use the Right Settings and Techniques
Long-term maintenance also involves properly managing your mixer’s settings. Always start on low speed to prevent undue stress on the motor and gear system, then gradually increase as needed. For example, when kneading dough, I typically begin at a slow speed, then switch to medium once the ingredients are combined. Over time, consistently using the correct speed reduces strain and prevents overheating. Additionally, avoiding overloading the bowl with too much dough or batter in one go minimizes wear. For more insights on optimal operation, review this detailed comparison.
How do I maintain my baking mixer over time?
The key to long-lasting performance is regular cleaning, gentle lubrication, and using the correct attachments for each task. Inspect your equipment periodically for signs of wear or damage, and replace worn parts promptly. Investing in a dedicated stand mixer for heavy doughs and a lightweight hand mixer for lighter tasks can also prolong the life of your tools. Remember, a well-maintained mixer not only lasts longer but also ensures your baked goods come out perfect every time. To stay ahead, consider subscribing to expert newsletters that offer monthly maintenance tips and new tool reviews, helping you keep your equipment in top shape for years to come. Don’t forget to try out these advanced maintenance tips—your baking will thank you!
The Hardest Lesson I Learned About stand mixer,hand mixer,baking mixer,whisk attachments,dough mixing
One of my biggest surprises was realizing that not all mixers are created equal when it comes to handling dense doughs or delicate whisking. I once tried to knead bread dough with a basic hand mixer, only to find it struggling and overheating. That taught me that investing in a quality stand mixer with a powerful motor and sturdy attachments is essential for serious baking. It’s a lightbulb moment that changed how I approach equipment choices, emphasizing the importance of matching your mixer’s capabilities with your baking ambitions.
What I Wish I Knew About Mixer Attachments and Their True Potential
Initially, I thought all whisk attachments were interchangeable and that I could use any with any mixer. Turns out, compatibility and quality matter much more than I realized. Using high-quality stainless steel whisk attachments has transformed my whipped creams and meringues, making them fluffier and more stable. I learned that choosing the right attachment for your specific task — whether whisking, beating, or kneading — can save you time and produce professional results. For more insights, I recommend exploring this guide on whisk attachments.
How Overlooking Maintenance Can Sabotage Your Baking
Neglecting the cleaning and lubrication of your mixer can lead to premature wear and tear, which might cause unexpected breakdowns right when you need it most. I learned to regularly inspect, clean, and lightly lubricate my stand mixer’s gear mechanisms, especially before heavy dough sessions. This simple habit has extended my equipment’s lifespan significantly and kept my baked goods tasting fresh. Remember, a well-maintained mixer is a reliable partner in your baking journey. For detailed maintenance tips, check this comprehensive guide.
Why Speed Control Can Make or Break Your Baking Results
Running your mixer at the wrong speed can turn a simple task into a disaster. I discovered that starting slow when mixing ingredients prevents splatters and overworking delicate mixtures like egg whites or whipped cream. Gradually increasing speed ensures even aeration and a smoother texture. Over time, mastering the art of adjusting your mixer’s speed has made my baking more consistent and enjoyable. If you want to refine your technique, see this comparison of speed practices.
The Unseen Power of Proper Attachments in Achieving Baking Perfection
High-quality attachments aren’t just accessories; they’re the secret weapon for professional results. I found that stainless steel whisk attachments resist rust, conduct heat better, and last longer than cheaper plastic ones. Using the right attachment for each task — a dough hook for bread, a whisk for meringue — makes a noticeable difference in texture and appearance. To choose the best tools, I highly recommend this expert resource on attachments.
Curated Resources for the Avid Baker
- Ultimate Guide to Choosing the Perfect Mixer: A comprehensive resource that helps you match your baking needs with the right stand or hand mixer. It covers everything from motor power to attachment compatibility.
- Top-rated Whisk Attachments: Discover durable, rust-resistant stainless steel options that elevate your whipping game and last for years. Ideal for meringues, whipped cream, and light batters.
- Maintenance and Longevity Tips: Learn how regular cleaning, lubrication, and proper storage can keep your mixer performing at its best, saving you money and frustration in the long run.
- Expert Tips on Speed and Technique: Fine-tune your mixing process with insights on optimal speeds for different recipes, ensuring perfect textures every time.
Your Next Step Toward Baking Mastery
Now that you’ve uncovered these insider lessons, it’s time to put them into practice. Whether you’re updating your equipment or refining your technique, remember that the right mixer and attachments can transform your baking outcomes. Don’t be afraid to experiment and find what works best for your kitchen. Your perfect loaf or fluffy meringue is just a few adjustments away. Ready to elevate your baking game with better dough mixing and whisking? The future of your baking success starts now.
What’s the biggest challenge you’ve faced with your mixer or attachments? Share your story below — I’d love to hear your experiences!
,
Leave a Reply