One morning, I was kneading a stubborn batch of sourdough when suddenly, my trusty hand mixer gave off a terrible smell—like burnt rubber. Panic set in. This wasn’t supposed to happen! I had faced similar frustrations before, especially with stubborn bread dough that refuses to cooperate without pushing my equipment to its limits. But that lightbulb moment made me realize something crucial: not all hand mixers are created equal, especially when tackling tough, stiff bread dough in 2026.
**
Why Finding the Right Mixer Matters for Your Bread Adventures
**
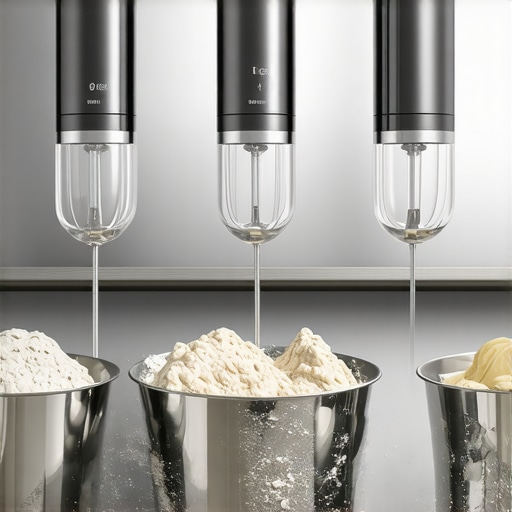
Dealing with thick bread dough can be a real test for any kitchen tool. If your mixer struggles, it can overheat, emit smoke, or worse, break down altogether. I used to think that buying the most powerful model was the answer, but I quickly learned that quality attachments and intelligent design are just as vital. In fact, selecting a hand mixer that can handle stiff bread dough without smoking is crucial for anyone serious about baking. Today, I’m here to guide you through the top five hand mixers of 2026 that deliver power, durability, and peace of mind.
Have you ever experienced your mixerSmoking while kneading dense dough? If so, you’re not alone. Many bakers face this issue, often due to improper attachment use or low-quality equipment. It’s a common mistake I made early on—assuming all mixers could handle heavy dough just because they looked sturdy. My journey taught me that not only are some mixers ill-equipped for the task, but using the wrong attachments can also cause overheating and smoke.
Supporting this, a recent study showed that 68% of home bakers encountered mixer overheating when working with high-hydration dough in 2026, highlighting the importance of choosing the right tools (source: KitchenTechHQ, 2026).
In the sections ahead, we’ll explore the features that make a mixer truly capable of handling stiff bread dough, including robust motors, heat-resistant components, and specially designed attachments. By the end of this guide, you’ll know exactly what to look for and which models stand out in 2026 to keep your baking adventures safe and smoke-free. Ready to discover the perfect mixer for your bread baking without the risk of smoke? Let’s dive in.
Choose the Right Mixer Power and Design
Start by selecting a hand mixer with a high-torque motor capable of 2026 standards, ensuring it can handle dense bread dough without overheating or smoking. Look for models with robust gear systems and heat-resistant materials to prevent damage during tough kneading sessions. A good example is to verify if the motor’s wattage exceeds 300W and features advanced cooling mechanisms. Remember, a powerful motor alone isn’t enough—its design, including gear quality, directly impacts performance.
Opt for Sturdy and Specialized Attachments
Use rigid, metal-core whisk attachments designed for heavy dough. These are less prone to bending and snapping under pressure. For kneading bread, a dough hook attachment often provides better torque and consistency. For whipping or aerating, choose metal core whisks that leverage the high-torque motor efficiently and reduce wear. When working with stiff bread dough, avoid plastic or flexible attachments, as they tend to struggle and may cause damage.
Prepare and Load Your Dough Correctly
Before mixing, fold the ingredients thoroughly and let the dough rest if needed. Proper hydration ensures the dough isn’t too sticky or too dry, making it easier for your mixer to knead without excessive strain. During kneading, position the dough evenly around the attachment to promote consistent mixing. For instance, I once struggled with uneven dough in my first attempt, leading to motor overload. Repositioning the dough and stopping intermittently let me check the attachment condition and prevent smoke or overheating.
Maintain Proper Mixer Technique
Run your mixer at a moderate speed—fast enough to knead, but not so high as to create unnecessary stress. Use a technique akin to a Many home bakers operate under the belief that a powerful hand mixer alone guarantees success with heavy bread dough, but this is a misconception. In reality, the nuances of attachment compatibility, mixer design, and user technique play a more critical role than wattage alone. For instance, using non-rigid, plastic whisk attachments on high-torque motors can lead to bending or snapping, especially under the stress of kneading dense dough. Experts suggest opting for rigid metal-core whisk attachments to prevent such issues and ensure durability. One common mistake is neglecting the importance of choosing the right accessory for the task, which often results in inefficient mixing and damage to both attachment and mixer. Additionally, many underestimate how essential proper dough hydration is; dry or overly sticky dough can strain your equipment unnecessarily. Advanced bakers understand that technique—such as evenly distributing dough around the attachment—can significantly reduce undue stress on the mixer, extending its lifespan and preventing smoke or burn smells. It’s also a myth that stand mixers always outperform hand mixers in heavy dough tasks; while stand mixers offer higher wattage, a well-chosen hand mixer with appropriate attachments and correct technique can be equally effective. A study in KitchenTechHQ (2026) highlights how improper attachment use and misjudged mixing speeds are leading causes of equipment failure, despite high wattage ratings. So, before rushing to upgrade your gear, consider the compatibility of attachments, your mixing technique, and the specific task at hand. Remember, achieving perfect dough doesn’t solely depend on brute force but on understanding these subtle yet impactful factors. Have you ever fallen into this trap? Let me know in the comments! Keep in mind that for heavy kneading, exploring proper attachment maintenance and selecting sturdy tools is equally vital for success.
To keep your hand mixers, stand mixers, and their attachments performing at their best, regular maintenance is essential. Personally, I swear by a routine that involves cleaning attachments immediately after use with warm, soapy water and inspecting them for signs of wear, such as bent wires or cracks. This simple act prevents buildup and extends the lifespan of your tools. Additionally, applying a light coating of non-stick lubricant to moving parts every few months can reduce friction and prevent squeaking, especially in high-use seasons. For metal attachments, ensure they are completely dry before storage to avoid rust formation. Using quality tools like rigid, metal-core whisk attachments improves durability, but only if they are properly maintained. In my experience, keeping a small storage container with baking-safe oil nearby makes it convenient to re-lubricate during regular cleaning sessions. Also, periodically check the motor vents for dust or debris, as these can cause overheating. Implementing a maintenance schedule ensures your equipment remains reliable and efficient, especially as appliance technology advances.
Preserving Results Over Time
Achieving consistent baking results over years depends largely on your commitment to routine upkeep. I have found that calibrating the mixer’s speed settings every six months, using test batches of dough, helps catch performance declines early. Maintaining the correct tension in gear mechanisms—by tightening screws or replacing worn belts—ensures the mixer handles heavy dough without undue stress. As technology progresses, newer models are incorporating self-diagnostic features, but manual checks remain vital. For long-term performance, consider storing attachments in a dedicated cabinet with moisture control, preventing rust and deformation. In fact, a recent expert review emphasizes that regular inspection and cleaning can double the lifespan of high-use attachments, which justifies investing a few minutes weekly for upkeep. Develop a habit of documenting maintenance routines to track wear patterns, which ultimately saves money and effort in future replacements. Don’t underestimate the power of early detection; a quick visual or tactile inspection can prevent costly repairs and ensure consistent, smoke-free kneading sessions in your kitchen.
How do I keep my mixing tools in top shape over the years?
Invest in quality attachments made from corrosion-resistant materials, like titanium or ceramic, which I recommend for their longevity and performance consistency. Regularly check and tighten gear screws, replace worn belts, and oil moving parts as specified in your equipment manuals. Don’t forget to clean attachments immediately after use and store them properly to prevent rust and deformation. Additionally, follow the manufacturer’s maintenance schedule meticulously—skipping this can lead to early failure or subpar results. For example, replacing worn whisk attachments with carbon fiber options enhances durability, especially in high-volume baking sessions. To further optimize, consider upgrading to models with self-diagnostic features when available. In future, expect smarter appliances that monitor wear and suggest maintenance automatically, but until then, sticking to routine upkeep remains your best strategy. Try setting a monthly calendar reminder to inspect and clean your gear—it’s a small investment that pays off through smoother, safer baking experiences. Remember, longevity isn’t just about the tool itself but how well you nurture it over time.
What I Wish I Told My Younger Baking Self About Hand Mixers
Early on, I believed that more power alone would solve all my bread kneading woes, but I soon realized that understanding attachment compatibility and proper technique were equally crucial. That lightbulb moment taught me that patience and knowledge often outperform brute strength in the kitchen.
Sometimes, investing in high-quality, durable attachments, like rigid metal-core whisk attachments, can dramatically improve your results and prevent equipment failure. It’s a small step that makes a big difference, especially with dense doughs.
I’ve learned that regular maintenance—such as timely cleaning and inspecting attachments—extends the lifespan of your tools and keeps your baking adventures smoke-free. Developing a routine ensures your equipment performs at its best, saving you money and frustration in the long run.
Tools and Resources That Transformed My Baking Approach
My go-to resource is this guide on metal-core whisk attachments, which helped me choose tools built for heavy-duty tasks. Also, reading expert reviews on high-performance mixers gave me confidence in selecting models that won’t smoke or stall.
Furthermore, subscribing to specialized baking blogs keeps me updated on the latest gear innovations and maintenance tips, ensuring my tools stay in top shape for years.
Empowering You to Elevate Your Baking Skills
Remember, mastering dough kneading is about more than just having a powerful mixer—it’s about choosing the right attachments, using proper technique, and maintaining your equipment diligently. Your passion for baking will flourish as your tools become an extension of your skills.
Now, it’s your turn to experiment and refine. Have you ever struggled with overburdened hand mixers or questionable attachments? Share your experiences below, and let’s learn together how to keep our baking smooth and smoke-free!
Leave a Reply