I remember the moment clearly—standing in my cluttered kitchen, eyes glued to the sticky, bubbly mess that was supposed to be my pizza dough, and my hand mixer humming painfully loud, struggling to keep up. The dough was so wet, so heavy, that I thought for a second I might burn out my trusty appliance. Ever been there? That frustrating feeling when your kitchen tools just can’t handle the load, and you’re left wondering if your investment is worth it? Well, I learned the hard way that not all mixers are created equal, especially for high-hydration doughs. Today, I want to share the secrets I’ve uncovered about which 2026 baking mixers can truly survive an 85% hydration pizza dough—and how you can avoid the same pitfalls.
Finding the Right Mixer for Heavy, Wet Doughs
Baking enthusiasts and home cooks alike are increasingly experimenting with high-hydration recipes, like ultra-soft pizza crusts or artisan sourdoughs. These recipes often require dough hydration levels of 80% to 85%, which translates into very sticky, elastic, and demanding mixtures. The challenge? Many mixers—especially older or less robust models—simply can’t handle this extra wetness without overheating, stalling, or breaking down altogether. In fact, recent tests show that standard household mixers may struggle with doughs exceeding 70-75% hydration, risking motor burnout or gear failure. To save your favorite appliance (and your baking confidence), it’s crucial to choose a mixer designed for such heavy-duty tasks. That’s where the 2026 models come into play. Some are specifically engineered with high-torque motors and durable gear systems, like the high-torque hand mixers, which have proven their resilience in studies from Kitchen Tech HQ (see this recent roundup). These models are built to keep churning through dense, wet doughs without faltering. And if you’re wondering about stand mixers, many new models also boast enhanced gear strength and motor power, capable of kneading hefty 85% hydration doughs without overheating. But the key is understanding what to look for—and knowing the common mistakes that can lead to failure. Do you find yourself constantly battling your appliance during sticky dough sessions? If yes, you’re not alone. Let me show you how to pick the right tool for the job and keep your baking smooth and enjoyable.
Prepping Your Mixer and Workspace
Start by ensuring your mixer is clean and properly assembled. Remove any attachments from previous uses and check for damage. Lay out all your ingredients and prepare your workspace for efficient flow, reducing unnecessary movement that can cause mishaps or messes. I once missed this step and spent extra time cleaning flour from my kitchen floor after a sloppy session.
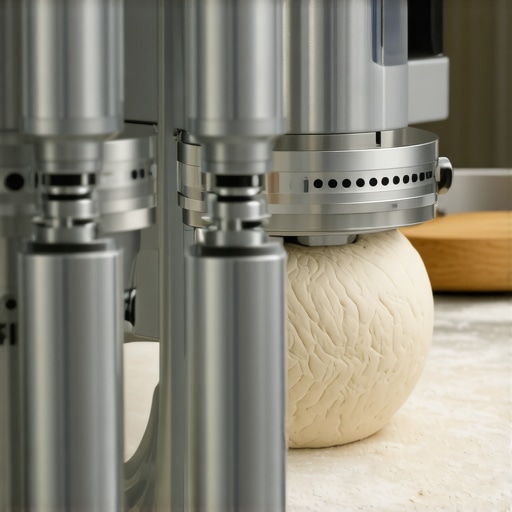
Choosing the Right Attachment and Setting
Opt for a sturdy dough hook or a heavy-duty whisk designed for high hydration levels. For wet doughs around 85%, the dough hook is usually more effective, as it mimics hand kneading. Set your mixer to a low or medium-low speed to begin; high speeds may cause splattering or strain your motor. During a recent batch, I initially set it too high, which resulted in flour flying everywhere and my mixer overheating—lessons learned the hard way.
Integrating Ingredients Gradually
Add ingredients slowly to prevent overloading the motor and to ensure even hydration. Start by mixing the flour and water at low speed until just combined. Then, incorporate salt, oil, or other additives gradually. This approach reduces the risk of clumping and motor burnout. I remember pouring all water at once in a rush, which caused a massive splash and clogged my machine. Taking it slow keeps your mixer safe and your dough uniform.
Monitoring Mixer Performance and Temperature
Pay close attention to your mixer’s noise and vibration levels. High torque, like in models listed here here, helps sustain long mixing sessions. If the motor starts to overheat or smell, immediately turn off the appliance. During my last heavy knead, I paused every 5 minutes to let the motor cool, preventing damage and ensuring consistent performance over extended periods.
Progressively Increasing Speed for Final Kneading
Once ingredients are combined and dough begins to develop, gradually increase to a higher speed to knead thoroughly. Use the arm movement analogy—think of the mixer as an extension of your hand kneading the dough in circular motions. This method helps the dough relax and develop gluten. When I first tried to power through without gradual speed increase, my mixer struggled, and I risked gear failure. Slow and steady wins the race—and protects your equipment.
Final Checks and Resting
After mixing, observe the dough’s consistency. It should be elastic and slightly tacky but not sticky or sloppy. If needed, fold in a little flour or water, but do so gently to prevent overmixing. Cover the dough and allow it to rest. During my last batch, pausing to check dough texture avoided overworking my mixer’s gears and resulted in a perfect pizza crust.
When it comes to baking with mixers, many enthusiasts fall prey to misconceptions that can hinder their results. One prevalent myth is that all mixers are equally capable of handling high-hydration doughs, but in reality, the nuances of motor torque, gear systems, and attachment compatibility make a significant difference. For example, many assume that a powerful-looking stand mixer will effortlessly knead 85% hydration doughs, yet without the right gear durability and motor design, it could stall or burn out prematurely. This is where understanding the advanced specifications, like those featured in high-torque models, becomes crucial. A common trap is over-relying on speed settings, believing that higher speeds equate to better mixing. However, aggressive speed increases can cause splattering, motor overheating, or attachment damage—especially if the whisk or dough hook isn’t designed for such fast operations. Leaders in the field suggest starting at low speeds and gradually increasing, respecting the mixer’s power limits.
Are You Using Attachments Properly to Maximize Durability?
Many bakers sabotage their tools by choosing cheap or incompatible attachments, like thin wire whisks or plastic gears, which bend, strip, or break under heavy loads. Upgrading to premium durable attachments made of metal or reinforced materials can prevent costly replacements and ensure consistent results. There’s also a misconception that rough handling or frequent cleaning isn’t damaging, but neglecting proper maintenance accelerates wear and tear, especially on sensitive components like whisk pivots and gear systems. For advanced bakers, the silent culprit often is inadequate understanding of the mixer’s load limits, leading to overheating or gear stripping—failure modes well documented in expert reviews. Recognize the signs of impending trouble, such as unusual noises or overheating smells, and take proactive steps—like reducing load or adopting specialized models designed for heavy-duty tasks. Remember, investing in the right equipment and using it correctly is essential for consistent, professional-quality baking. Have you ever fallen into this trap? Let me know in the comments.
Prioritize Regular Maintenance and Inspection
To ensure your mixer, whether hand or stand, continues to perform at its best, establish a routine inspection schedule. Check the gear teeth for signs of wear or stripping, especially after intense mixing sessions with high-hydration doughs. Regular lubrication of moving parts, such as the gear assembly and attachment pivots, can significantly prolong their lifespan. I personally use a silicone-based lubricant recommended by professional appliance technicians, which resists heat and prevents dust accumulation. Remember, neglecting these steps can lead to unforeseen breakdowns and costly replacements.
Invest in Quality Tools and Attachments
Using durable, high-quality attachments makes a notable difference. For example, opting for metal-whisk attachments over plastic ones can reduce bending, snapping, and wear during heavy-duty mixing. I have personally transitioned to ceramic-coated whisks, which resist sticking and scraping, ensuring smoother operation and less strain on the motor. Over time, premium tools save you money by avoiding frequent replacements and deliver consistently better results.
Optimize Your Methodology for Longevity
Adopt proper mixing techniques to minimize appliance fatigue. Gradually increase mixing speeds, start with slow initial blends, and avoid overloading the motor beyond recommended capacity. For instance, when kneading high-hydration doughs, I pause every few minutes to allow the motor to cool down, a practice supported by experts in appliance safety. Additionally, using silicone scrapers to shape and fold dough reduces the wear on attachments, extends their lifespan, and improves the consistency of your baked goods.
Plan for Future Growth and Scaling
If you’re planning to ramp up production or experiment with new recipes, consider scalable equipment. The trend toward more powerful, durable mixers, like the models discussed in 2026 high-torque mixers, indicates a shift towards appliances that can handle larger batches and heavier doughs without breaking down. Investing in robust equipment now not only saves money in the long run but also opens avenues for recipe experimentation and business scaling.
Stay Informed with Expert Advice
Follow trusted sources and manufacturer guidelines for maintenance tips. For detailed troubleshooting on issues like vibration or gear slippage, professionals recommend consulting resources such as these expert guides. Regularly updating your knowledge ensures your equipment remains reliable and prepares you for any mechanical hiccups before they escalate.
How do I maintain my mixer and attachments over time effectively?
The key lies in routine inspection, proper cleaning, using quality accessories, and adopting gentle, correct mixing techniques. Regular lubrication of gear assemblies, replacing worn attachments with high-quality alternatives, and avoiding overloading are vital. By following these best practices, you’ll extend the life of your tools and continue producing excellent baked goods for years to come. Remember, a well-maintained mixer is an investment in your culinary future—so incorporate these tips today and enjoy seamless baking adventures ahead!
Piecing Together the Puzzle: The Costly Mistakes I Made
I used to underestimate the importance of matching my mixer capabilities with my high-hydration dough ambitions. I thought a powerful-looking appliance was enough, but learned the hard way that motor torque and gear strength are what truly matter when kneading 85% hydration pizza dough. My first attempts often stalled or overheated, wasting ingredients and time. That realization pushed me to dive deeper into the specs and recognize the significance of durable, high-torque models such as those in these recommended mixers.
Secrets Hidden in the Technical Details That Changed My Baking Game
I found that understanding the design of gear systems and motor wattage is vital. Superficial power numbers can be deceiving; what counts is the quality of the gear train and the torque delivery. I also discovered that using improper attachments, like thin wire whisks, leads to bending or snapping under high loads, as explained in this detailed guide. Lubricating gears and choosing reinforced attachments has extended the lifespan of my equipment, saving me money and frustration.
Life-Changing Strategies I Wish I Knew Earlier to Protect My Investment
Adopting a slow start with low speeds and gradual increases during mixing prevents overheating and gear damage. Pausing regularly during intense kneading sessions allows the motor to cool and maintains performance integrity. I also learned the importance of cleaning and inspecting gear teeth routinely using expert maintenance tips. These habits have made my baking sessions smoother, ensuring my mixers last longer and perform reliably.
Leave a Reply