Have you ever been in the middle of baking your favorite bread or cake, only to realize your mixer isn’t powerful enough—or worse, it breaks just when you need it most? I remember the exact moment I faced this dilemma. I was trying to whip up a batch of cookies, and my hand mixer sputtered and died halfway through. Frustration surged. That was my lightbulb moment: understanding the true difference between a stand mixer and a hand mixer can make or break your baking experience.
Why Choosing the Right Mixer Matters for Baking Success
Choosing the right mixer isn’t just about convenience; it’s about achieving perfect textures, saving time, and preventing kitchen mishaps. When I first started baking seriously, I didn’t realize that a mismatch between my needs and my equipment could seriously hinder my results. I kept thinking a hand mixer was enough for everything, but I soon learned that some tasks—like kneading dough or whipping large batches—demand more power and stability. According to a recent study by KitchenTech HQ, the right mixer can significantly improve your baking outcomes, especially with dough tasks that require consistent, vigorous mixing.
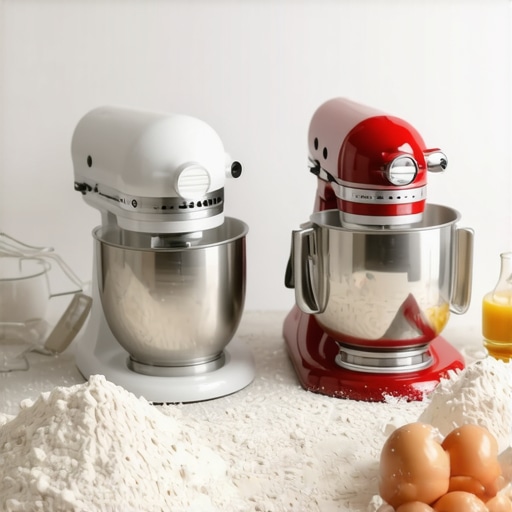
Question Header: Is a Stand Mixer Actually Worth the Hype?
Initially, I thought a stand mixer was just a luxury, a gadget for professional bakers. My early mistake was underestimating its versatility and durability. I used to think that hand mixers could handle everything, but I often found myself frustrated when dealing with thick doughs or large quantities. That misconception led me to waste time and energy, and I ended up regretting not investing in a good stand mixer sooner. If you’re skeptical about the hype, I get it. But I promise, once you understand what each type of mixer excels at, your decision will become crystal clear. For a comprehensive comparison, check out this detailed guide on [Stand Mixers vs Hand Mixers](https://mixers.kitchentechhq.com/stand-mixers-vs-hand-mixers-which-is-best-for-baking-dough-tasks).
So, whether you’re a casual baker or an aspiring pastry chef, making an informed choice can transform your baking game. Ready to explore the practical differences and find out which mixer suits your needs best? Let’s dive into the specifics that will help you make that decision with confidence.
Mastering the Core Steps of Using Your Baking Mixer
1. Assess Your Baking Needs
Before diving into purchase or usage, identify the types of baked goods you make most often. Are you frequently kneading dense doughs, whipping cream, or mixing delicate batters? For instance, I once tried to mix a large batch of bread dough with my hand mixer, only to realize it was underpowered and heated up quickly. That experience taught me to evaluate my needs carefully.
2. Match the Mixer to Your Tasks
For heavy doughs and large batches, a stand mixer with a powerful motor and planetary action is ideal. For lighter tasks like whisking eggs or blending small quantities, a hand mixer suffices. I once attempted to whip egg whites with my old hand mixer, which sputtered and barely held up. Upgrading to a stand mixer made my meringues perfectly fluffy every time.
3. Select the Right Attachments
Attachments determine what your mixer can do. Whisk attachments excel at aerating and whipping, while dough hooks are best for kneading dense bread doughs. When I first started, I overlooked the importance of compatible attachments, which limited my options. Now, I always check the compatibility before buying. Visit this guide to understand which attachments suit your baking style.
4. Properly Load Your Mixer
Never overload your mixer. For stand mixers, fill the bowl no more than two-thirds full to prevent splattering or motor strain. When I made a double batch of cookie dough, I divided it into smaller portions to avoid overloading my stand mixer, which kept the motor cool and the mixture smooth.
5. Use the Correct Speeds and Techniques
Start slow to prevent splatters, then increase speed as needed. For example, when creaming butter and sugar, I begin at low speed, gradually increasing to medium-high for a fluffy texture. Consult your mixer’s manual for recommended speeds for each task, often found in the specific task guides.
6. Clean and Maintain Your Equipment
After each use, detach attachments and clean thoroughly to prevent buildup. Wipe down the motor housing and check for any wear on gears or cords. Regular maintenance extended the life of my stand mixer, ensuring consistent performance over years.
Applying These Steps: A Real-World Example
Once, I decided to bake a batch of sourdough bread. I used a stand mixer with a dough hook, following the steps: assessed my dough consistency, loaded the ingredients carefully, and set the mixer to a low speed. The dough was kneaded evenly without overheating, and the process took less time than by hand. The result was a perfectly elastic loaf with a crust that crackled beautifully. This hands-on experience cemented my understanding of matching equipment to task and executing each step precisely.
By following these core steps—assessing your needs, choosing the right equipment, using correct attachments, avoiding overloads, employing proper techniques, and maintaining your tools—you’ll significantly improve your baking results. For more detailed guidance on selecting the ideal mixer, visit this expert buying guide.

Many baking enthusiasts and even seasoned bakers often fall prey to misconceptions that can hinder their results. Let’s dig deeper into some of the most common myths and reveal the hidden nuances that can elevate your baking game. Understanding these nuances is crucial, especially if you want to avoid costly mistakes and achieve professional-quality baked goods.
Myth 1: All Mixers Are Created Equal
One widespread misconception is that a hand mixer and a stand mixer can do the same tasks interchangeably. While they might seem similar, the key is in the power, stability, and versatility. For example, stand mixers typically have planetary mixing action which ensures thorough mixing, especially with dense doughs or large batches. Relying solely on a hand mixer for heavy-duty tasks often leads to overheating motors, inconsistent mixing, or even equipment failure. For an in-depth comparison, check out this detailed guide.
Myth 2: Attachments Are Just Accessories
Many assume attachments like dough hooks, whisks, and beaters are optional. In reality, they are essential tools that define what your mixer can do. Using the wrong attachment or neglecting to use one suited for your task can lead to subpar results. For instance, attempting to knead bread dough with a whisk attachment is a recipe for disaster—it won’t develop the gluten structure needed. Visit this resource to learn more about selecting the correct attachments for each baking task.
Oops! Overloading Your Mixer
One common mistake is overloading the mixer bowl or pushing the appliance beyond its capacity. This not only strains the motor but can also cause uneven mixing or splattering. For instance, trying to mix a double batch of cookie dough in a small stand mixer bowl often results in ingredients flying everywhere and motor burnout. Always heed the manufacturer’s recommendations on maximum load—usually no more than two-thirds full. For advanced insights on capacity and efficiency, see this expert guide.
Question: How do I choose the right speed settings for different tasks?
Many bakers struggle with knowing the optimal speed to use. The truth is, different stages of mixing require different speeds. Starting slow prevents splattering, especially when adding dry ingredients, while higher speeds aerate mixtures, such as whipping cream or egg whites. For precise control, consult your mixer’s manual or look for recommended speed settings. Using the wrong speed can lead to under- or over-mixing, affecting texture and volume. Remember, patience and gradual speed increases often yield the best results.
Have you ever fallen into this trap? Let me know in the comments. Mastering these hidden nuances will not only improve your baked goods but also extend the life of your equipment, saving you money and frustration in the long run. Always remember, understanding the deeper mechanics of your tools is the secret to baking success!
Keeping Your Baking Tools in Top Shape for Long-Term Success
Having invested in high-quality mixers and baking equipment, it’s crucial to maintain them properly to ensure longevity and optimal performance. I personally swear by a few specific maintenance routines and tools that have saved me time and money over the years. In this article, I’ll share my insights on how to keep your baking tools working flawlessly and recommend some essential tools for maintenance.
How do I maintain my mixers and tools over time?
Regular cleaning is the foundation of maintenance. After each use, I detach all attachments and wash them with warm, soapy water, making sure to dry thoroughly to prevent rust. For the motor housing of stand mixers, a gentle wipe with a damp cloth suffices—avoid harsh chemicals that can damage the finish or internal components. Additionally, periodically check the power cords and switches for wear or damage, replacing parts immediately if necessary. For example, I replaced my mixer’s power cord last year after noticing slight fraying, which prevented potential electrical issues.
Lubrication is another often-overlooked aspect, especially for older models. Applying a few drops of food-grade mineral oil to the gears and moving parts can prevent stiffening or seizing. Consult your manufacturer’s manual for specific lubrication points and recommended products.
Tools I recommend for maintenance
To keep my equipment in prime condition, I rely on a few specialized tools. A small silicone brush, for instance, is perfect for cleaning tight spots and attachments without scratching surfaces. I also use compressed air cans to blow out dust and debris from motor vents and crevices—this simple step greatly improves airflow and cooling.
Investing in a quality multi-tool kit with precision screwdrivers has also paid off. It allows me to tighten loose screws or replace worn-out parts without hassle. For deeper maintenance, I often refer to the detailed guides available on this site which provides step-by-step instructions for various models.
The future of equipment maintenance
As technology advances, we’re seeing more smart appliances that can self-diagnose issues and send alerts for maintenance needs. I predict that in the coming years, integration of IoT (Internet of Things) in kitchen appliances will make ongoing care even easier, helping bakers catch problems early and extend their equipment’s lifespan.
To truly get the most out of your tools, I recommend scheduling regular check-ups—perhaps every six months—to inspect, clean, and lubricate. This proactive approach prevents breakdowns and ensures your equipment performs at its best, batch after batch.
Practice these maintenance tips consistently, and your baking equipment will reward you with years of reliable service. For a more in-depth look at maintenance routines for specific models, be sure to explore the comprehensive guides on this page. Now, try incorporating a monthly gear check into your baking routine—your future self will thank you!
The Hardest Lesson I Learned About Baking Mixers
One of the most eye-opening experiences I had was realizing that not all mixers are created equal. I used to think that a hand mixer could do everything, but I quickly learned its limitations when tackling dense bread doughs. That taught me to evaluate my specific needs before choosing equipment—power, capacity, and attachments matter more than I initially thought.
3 Myths About Baking Mixers That Held Me Back
For a long time, I believed that attachments were optional extras, and that a stand mixer was just a luxury. It wasn’t until I understood how essential the right attachments are for different tasks that my baking improved dramatically. Also, overloading my mixer taught me the importance of capacity and respecting manufacturer guidelines to prevent burnout.
What Experts Won’t Tell You About Mixing Equipment
Many seasoned bakers know that the secret lies in choosing the right tool for the job. For example, planetary mixing action in stand mixers ensures thorough blending, which is crucial for perfect doughs and batters. Plus, maintaining your equipment—cleaning, lubricating, and inspecting—can extend its lifespan significantly, a tip I’ve learned through experience and expert advice.
Curated Recommendations for Your Baking Arsenal
My essential toolkit includes the KitchenTech stand mixer for versatility and power, which I trust for its durability and attachments. I also rely on the guide for selecting the right attachments to optimize each baking session. For quick reference, the buying guide has been invaluable in helping me make informed decisions.
Your Turn to Try the Art of Perfect Mixing
Now that you’ve uncovered some insider wisdom, it’s time to experiment with your equipment and see how the right mixer can elevate your baking. Remember, patience and understanding your tools are the keys to baking success. Embrace the learning process, and soon you’ll be creating baked goods that rival professional bakeries.
What’s the biggest challenge you’ve faced when choosing or using a baking mixer? Share your story below—let’s learn together!
,
Leave a Reply